Around the same time I bought the lumber for my office bookshelf - it may have been the same trip - I bought the lumber to build a sit/stand desk.
Back when I worked in an office I briefly had a sit stand desk in my cubicle. It was nice to be able to stand part of the day and to sit part of the day. Now that I am permanently working from home - it will be a sad day if somehow I am ever forced to return to an office - I wanted to make my office work for me.
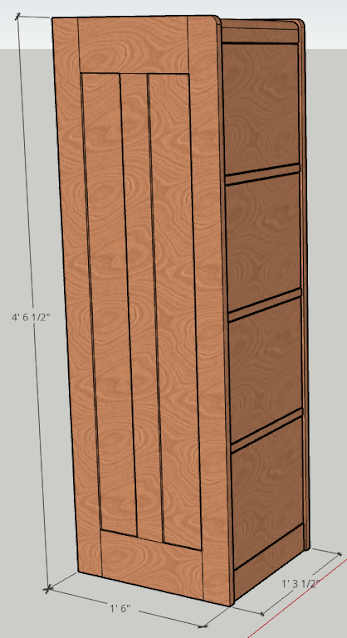
Step one of that was to build the Slant Front Bookshelf from my prior post. Step two was to build a sit/stand desk. My requirements were:
- I wanted a little more space than I had with my 30" x 60" metal office table
- I wanted it to be pretty
- I didn't want to go overboard on design and construction - no frills
The story of how this desk finally came to be is the same as my Slant Front Bookcase. In brief, shortly after buying all the supplies to build the desk we lost my father-in-law. The subsequent year and a half was busy readjusting to life helping take care of my mother-in-law.
However, after finishing my bookshelf over this summer I realized if I hurried I could finish my desk before it got too cold to use my garage as a finishing room. I double checked the weather forecast and saw a one week window where the weather would be in the 60's F.
You miss 100% of the shots you don't take so I buckled down and spent what weekend and evening time I had available to get the desk top built.

I started by milling the 5/4 Sapele boards for the desktop getting them flat and straight. After arranging them in as good of a pattern as I could I glued two up two sets of two. After letting the glue dry overnight I glued the two halves together.

Then it was two or three evenings of sanding and scraping to get the tops flat and scratch free.

I trimmed the ends with a circular saw and straight edge, then rounded the corners with a 1/2" router template, and rounded the edges with a 1/4" router bit.
A little more sanding - about and evenings worth - and dust removal and it was ready for finishing.

The finishing process took about a week. I used General Finishes Oil and Urethane thinned with mineral spirits to make it into a wiping varnish. It works well for me; however, it is slow to build. Also with the weather being cooler than optimal for curing I was giving it a full day between coats.
After letting the finish cure for about 10 more days I attached the legs and set the desk in place.

The weird thing on the wall is a temporary shelf stuck vertically in a French cleat. When I want to use my personal computer at the desk I can close the lid on my work laptop, re-orient the shelf, and use my personal laptop pretty much the same as my work one.
I had plans for building shelves but as you can see from the red leaves outside my office window we were well into fall at this point and I was afraid I wasn't going to get another span of days nice enough to do finishing.
Then, not a week later I saw four days of acceptable weather predicted in the long range forecast. I figured I may as well try to get the shelves done. Worst case I just have some wider boards sitting on my lumber rack for the winter.
The 3/4" Sapele boards I had for my shelves were long enough and wide enough that I could cut them in half and then glue them back together to make all the parts of the shelves. I raced through the milling process so I could get them glued up.

I probably should have taken a little more time with this step as I didn't get the best joints I possibly could have. However, I was able to put those parts in inconspicuous spots so I am not too worried about it.
After scraping the glue I was able to put these boards back through my planer to get them flat again. It was nice to not have to scrape them. However, sanding actually took longer. The shelves have more surface area than my desk. C'est la vie.
I built a quick straight edge for my router to make the stopped dados for the joinery. It worked great. The only failing was when I didn't clamp it down tight enough and it slipped. Fortunately I caught it before I totally ruined the side I was working on. I "fixed" it by finishing the dado I was cutting, then slid the straight edge down a little to just cut the dado a little wider.
Unfortunately this meant I had two separate setups for cutting the matching tongues but it wasn't too bad. I normally use a dado blade in my table saw but these boards were too long. I have a radial arm saw I could have used but it isn't fully set up yet. After much pondering I used my 2 HP router with a rabbeting bit to cut the tongues. I had nearly no tear out on the ends. I love working with Sapele.
I was a little nervous about cutting the middle dividers to length but I measured three or a dozen times and then cut them. I really didn't have time for teeth gnashing and just had to get it done. Fortunately, my measurements were correct and all my dry fitting showed everything was fitting well.
I spent a lot of my non-workshop time thinking about how I was going to glue up these massively long shelves considering order of operations and with what I had available in my workshop. What I ended up doing was gluing and clamping the dividers into the shelves and letting the ends hang off my outfeed/assembly table.

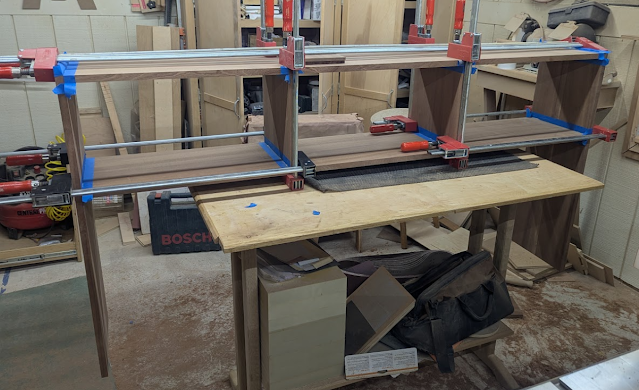
I wasn't excited about clamping to internal structure but I only have two of the really long k-body clamps.
I was a little worried about the weight of the sides bowing the shelves upwards while the glue was still trying so after taking these pictures I took a couple of short k-body clamps and used them to shim up the shelves at the edges of my assembly table. I don't know if it was necessary because I did it and my shelves have no bowing.
The blue tape on the joints did help. However, I also got some tape stuck in the joints. I'm not sure if I'll try it again. I had minimal squeeze out regardless and cleaning up the tape was not zero effort.
After some final finish sanding it was time for the finishing room.

After applying the same wipe on poly as I'd used on the desk I moved it inside to finish curing. I was a little afraid the shelves would beat up the relatively soft sapele of the desktop so I used some double sided tape to tape some felt to the bottom of the legs. It stuck plenty well especially considering gravity is going to help keep the two pressed together.


I'm really happy with how it came out considering the short time - for me - that I spent making it. It's somewhat basic but I don't need anything fancy. I'm kind of a utilitarian sort of guy.
As a side bonus all my measurements came out exactly right. I was a little nervous bringing the shelves and the desk together the first time but they fit with just the right amount of margin. My new desk is about a foot longer than my old desk which required moving the bookshelf over. The door opens with inches to spare. Just as I planned it.
I've only tested the standing feature of my desk once. I need to make sure my cable management is completed such that I don't pinch any cables on the window trim and I don't want to yank anything off the desk if a cable is too short. I'll get to cable management over the next month as things start settling down again.
This was a fun if somewhat rushed project.