Monday, December 26, 2016

Workshop Makeover, Part 1

We're full on into snow season here in upstate NY so I'm really enjoying my basement workshop. With the insulation of the earth, added insulation I put in the walls it is the most comfortable room in the house.

I've decided that this year it is going to be all about the workshop. I might slip a small project in here and there; however, I'm going to give my workshop a makeover.  When I started doing woodworking I wanted to just dive in and start making things. I'd grudgingly make jigs when forced; however, I'd also try to jury rig things or worse hold things by hand which resulted in a lot of mistakes and low quality work. It was probably two years before I stopped using loose chunks of 2x4 to hold up the off-cuts from my chop saw. When I finally made a very rudimentary permanent support I finally had my eureka moment. Stop jury rigging things.

Since that moment, I've gotten a lot better. I've build a number of jigs to make my woodworking a lot more accurate and safe. However, I've never taken the time to give my workshop a full makeover. I'm still using the lumpy and uneven bench I inherited with the house to hold up my miter saw, I've got dust collection hoses stretched across my floor which create a tripping hazard and take up space. I don't have enough wood storage, my plywood is leaning against a wall, I've got old kitchen cabinets - also inherited - that aren't usable because they aren't accessible.

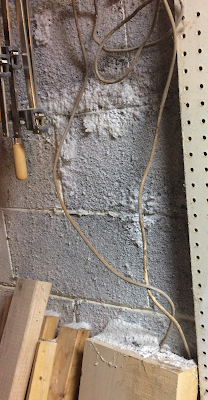
As an added complication I'm getting work done on one of my foundation walls this spring. I've got salt from vehicle runoff in my garage infiltrating through the cinder block walls.

The fix is pretty simple which is to clean up the block and install a vapor barrier. This should make the wall last longer than my life time. However, to get make room for the masons I need to clear out that area of my workshop.

There's not much on the wall, just some pegboard and some power outlets I don't use. I'm thinking I'll just remove it all. I do have tools stored on that wall; however, I'm thinking I can come up with something more efficient. I also have some longer wood off-cuts from previous projects leaning against the wall.

I have some ideas on what I'd like to do but the first step is getting an idea of what I have and what space I have to work with. Today I measured up my basement and made little cut outs for each of my tools.


The washer, dryer and utility sink aren't going anywhere. I also need to leave enough space around them do get laundry in and out. The utilities - furnace, sump and hot water aren't going to be moved. The rest of the basement is fair game.

Next step, planning the new layout!


Sunday, December 25, 2016

Dresser, Part 8 - The Top

As I've been ramping up my woodworking for this winter I've been spending some time on the top to the dresser. I don't have a lot of pictures mostly because despite it taking me two or three weeks to get it ready for the finishing room there's not really that many steps to it.

I had started a top previously but gave it up. The top requires a panel glue up that is 21" wide and 44" long. My plan was to glue up two pairs of board and to use my planer to make them flat again. Unfortunately my boards had wild enough grain that there was no direction I could pass them through the planer without getting severe chip-out. Frustrated I gave up and used those boards for other parts of the project. This was probably two years ago that I had reached this point.

The point I am at how is that the top is pretty much all that is left. Once the top is on I can put the back on - it's been ready and waiting for a year - and I can actually start using the dresser even as I finish the last few details.

I decided to attempt to reuse two of the boards from the old top and I added two new boards. I followed the same process as  I did the first time. When the planer started chipping the boards I tried a technique suggested to me by one of the clerks at Woodcraft which is to wet the tops of the boards with mineral spirits to soften the fibers and then send them through the planer.

This was a horrible idea. The first board passed through without any issue but the second board got stuck halfway through. When I stopped the planer and took a look at the board I saw black rubber marks on it. The rubber from the drive wheels on the planer was being dissolved by the mineral spirits! GAH!!!

I unplugged the planer, lifted it to its maximum height and wiped the rollers down with paper towels as best I could. I then let it sit for a day to finish drying. It's a quite expensive planer and I don't want to replace it because I do something dumb. Fortunately when I ran some boards through it the next day it all seemed to be fine.

But I have a new tool! I pulled out my new drum sander and it did a stunning job of removing the chipping from the boards. It took three or four heavy passes and the boards were then flat and chip free.

The next step was to glue the two pairs of boards together to make the full glue up. I took great care to get the boards to come out as even as possible. What little difference there was I removed with hand planes and my random orbit sander.

I used my circular saw and a straight edge to true up the ends, then I used my extra wide fence on my table saw to trim both ends straight, true and clean.


The top needs two more details. It gets a 1/4" bevel on the bottom of the sides and front and it gets a back rail. I used by 2 1/2 HP Dewalt handheld router and a large chamfer bit with a guide bearing to take small increments - about 1/6" each - until I  was down to the desired depth.

I'd made the back rail while the top was gluing. It's just another quartersawn white oak board that gets a 1/16" bevel around the top.


After chamfering the top and the back rail I glued the two of them together. One of the things I did to minimize glue squeeze out that I'd have to scrape off the front was to put a stopped groove on the bottom of the rail. I did this by setting my table saw fence to set the blade just a little inside the the thickness of the rail. I raised the blade so it'd make very shallow cut and marked the spot the blade entered and exited the top. This allowed me to drop the rail onto the blade, push the rail through until I hit the stop mark and then turn off the saw.


The glue up went well. I had plenty of squeeze out in the back and only a small spot to cleanup in the front. The groove worked.


It was later that night when I was thinking about the next steps that I realized I hadn't trimmed the width of the top yet. When I measured it I had a 22" wide board and it needs to be 21. Simple enough to fix. I just ran it through my table saw and reapplied the bevel to the front bottom.


After that it was a up to the finishing room where I could wipe the dust off with mineral spirits and apply my Watco Dark Walnut Oil. After two coats of oil I wiped the top down with shop towels until they came back mostly clean.


So far I'm pretty happy with how the top has come out. It's flat enough - not perfect but good enough. I kind of wish I'd remembered to put the wide board on the outside so when I trimmed the top to size it would be closer to the same size as the other boards. But, I'm happy enough with how it looks.

Tuesday, December 20, 2016

Dresser, Part 7 - Drawer Fronts

[Note: This posting is going up in December 2016; however, the progress was actually made back in June 2016 time-frame. I just got too busy to write it up.]

It took me most of my woodworking time for a weekend to get all the drawer fronts mounted on the drawer boxes. The process seems so easy. Drill a few holes for the hardware, drill some counter sunk holes in the boxes for attaching the drawer fronts, sink some screw and Bob's your uncle. Turns out there's a lot of holes each of which need some level of countersinking.

But before getting into drilling holes I needed to put slick tape into the  drawer openings. Slick tape is UHMW plastic with a sticky backing. It allows drawers to slide very smoothly. Unfortunately halfway though I ran out and had to order more. Even more unfortunately I couldn't find the same stuff I'd bought a few years back for my nightstand. All the stuff I was finding was much thicker. This is an issue because I'd sized the drawer boxes to just fit the openings assuming there was thinner tape. I ended up ordering a wide selection from Amazon until I found one I liked. After putting tape in all the openings I moved onto mounting the drawer fronts.

Slick Tape

First step for me was to mount the drawer fronts to the drawers. I drilled holes in the four corners of the drawer box fronts and countersunk them on the inside. I then put the drawer in the dresser and centered the drawer front. I used double faced tape to stick the drawer front to the drawer box. After getting the drawer fronts positioned correctly I used the holes in the box as a guide to predrill the screw holes for the front and then put in the screws holding the fronts to the boxes.

I never have good luck with this technique. I almost always have problems with the fronts shifting after I've pulled them out. I don't remember if I had this issue with these drawers or not. I may have just used copious amounts of tape. What I've done in other cases is to use the holes drilled for the pulls and use a bolt and nut tightened from the front of the drawer to hold everything in position until I could get the screws in.

Drawer Interior

So where are we at with number of holes drilled? Well, it's four per drawer; however, it required two different drill bits: one a little bigger than the screw for the clearance hole and one the size of the screw shank for the drawer front and a chamfer bit.

Next is drilling the holes for the drawer hardware. This is another three step hole. The pulls have a stem that needs a countersunk hole in the drawer front, a smaller clearance hole through the drawer box and then another countersunk hole in the box so the machine screw heads are recessed. I made two different jigs, one for each drawer size, which helped me get consistent results placing the hardware. This last step required three more drill bits.

Finally, I added some blocks in the back of the drawer openings to set the spacing. The blocks were supposed to be screwed in place but I was having problems getting the drill in to get the screws to go in straight. Instead I just grabbed my brad nailer and shot a couple of brads through each. That'll hold well enough and if I ever need to remove them they'll just pry right off.

Drawer Stops

In any case, the job is done - well, mostly - and looks pretty good all things considered.

Dresser with drawers installed

That said, there are three issues already.

At least two of the shelves the drawers ride on aren't flat. It wouldn't be a big deal if they bowed downwards but instead they are bowing upwards. This means there is a little "click" each time the drawer gets closed from the false front clipping the drawer dividers. I mitigated some of the issue on one of the drawers by using a block place to shave the drawer box to not have a lip in the front; however, the false front still hits the divider. I still need to work on the other drawer.

Unfortunately there isn't much more I can do about this issue.

The only other serious issue is that I wanted my drawers to be tight and one of the small drawer openings is a wee bit smaller and none of the drawer boxes fit. To keep from having a sticky drawer I'm going to have to make the drawer a bit thinner either by planing the sides down or sanding them on my stationary belt sander.

This issue is at least solvable.

The last issue is that I'm not real excited about how well the false fronts fit the openings. I did a sloppy job cutting them to width and length and as a result when I look at them closely the gaps around them aren't consistent.

This issue is merely a cosmetic issue that I will probably be the only person to notice.


Sunday, December 18, 2016

Wooden Wallet

"Wooden wallet? Are you messing with me?" - Nope.

I have a friend...  Let's call him Daquanne to preserve his anonymity. He found out I did woodworking when he saw one of my wooden business card holders. He thought they were stunning and asked me to make him a wooden wallet. Basically one of the business card holders but a little thicker.

I must admit I had two thoughts. The first was, "this is the stupidest thing I ever heard of." The second was, "I wonder if the geometry will all word out."

I thought that perhaps he'd take a super minimal wallet. More of a money clip to be honest. To make a prototype I took a 1/4" thick piece of poplar  and using my belt sander I thinned the edges out to give it a fair curve on the back leaving the face flat. I then took some sandpaper I folded down to about 1/2" wide and used it to put a slight recess in the back. by basically sawing it against the grain. I bought some elastic band and stapled it to the back stretching it around the front. It actually worked quite well for holding a couple of credit cards and a few bills together.

Unfortunately I didn't take a picture of it and I cannot find it. If I come across it I'll update this post.

More unfortunately Daquanne was quite displeased with it. Let's just say he's lucky I felt like giving it another try.

So instead of figuring out if the geometry of a thicker business card holder would work I offered to make a card holder that had the same basic geometry of a zippo lighter but large enough to hold a credit card, some cash and a bus card. Since I was working with a time constraint I decided to see if I could just throw one together out of some scrap Wenge and Padauk I had lying around. I did take a couple of minutes to sketch out a plan.


I started by planing my wenge down to about 3/8" x 1/2". It's not exact but doesn't need to be for this purpose. I then cut it into pieces for the sides, top and bottom mitering the corners. I reporposed and old jig I used for making picture frames and glued up the wallet frame.


I cut the long sides about 1/8" longer than I needed so I could use my table saw to separate the top and bottom pieces. I then sized the padauk to width and separated the top pieces and glued them on. Then I fit and glued the bottom pieces on one at a time.

You can see in the left picture that the paduak on the top piece doesn't cover all the wenge. This is because I wanted to use the wenge stubs for my hinge as you'll see in a bit. You can see I also left the paduak a little long. After gluing the front and back on I trimmed off the excess with my bandsaw.

Then I drilled a hole and inserted the hinge pin. Once the case was being held together I spent some time at my drum sander to make the padauk flush to the wenge and to round the corners slightly. I also softened the edges with some sandpaper.


For finish I took the suggestion of my wood monger - I don't know if monger is the correct term but it sounds cool - anyway, Valarie suggested I use shellac to seal the wood before pulling my standard oil and urethane on as the oil would darken the wood and I'd lose some of the bright red color. So I bought a can of spray shellac and hit the outside of the magazine case with that. Then since shallac really isn't an appropriate final finish for something that's going to be carried in a man's pocket all day I put two coats of my standard wipe on oil and urethane finish.


I still think a wooden wallet is stupid; however, for something I threw together with minimal planning I think it worked out pretty well. Most important, Daquanne was happy with it too.

Sunday, December 4, 2016

Magazine Boxes, Part 4 - Finishing

I used my standard finish on all the boxes which is General Finishes Oil & Urethane Satin thinned with Mineral spirits 2:1.

I like this finish because it is very forgiving. I get a lot of open time where I can deal with drips, pools and dry spots. Since the finish is thinned it self levels very nicely and since it is self leveling I can apply it with a rag instead of a brush. This means I can use a disposable shop towel and when I am done applying finish just hang the towel to dry. Once dry I just throw it out in the garbage. This makes cleanup a breeze. The finish cures quickly enough that I get very few dust nibs too.

There are exceptions. Some woods like cherry can end up looking blotchy with just an oil finish on them. Another issue comes up with woods that have a lot of natural oils in them. In these cases the oil in the wood keeps the polyurethane from curing correctly. I don't know of any North American woods that have too much natural oil; however, quite a few imported species do. This is why I always try my finish on an offcut first whenever I'm not familiar with a species.

The fix for both of these issues is to seal in the problem with shellac. Shellac doesn't have the same refraction properties as oil so it doesn't cause blotching and seals the pores so oil finishes put on top don't blotch. It will also seal in issues with oily woods.

I didn't have any oily woods in my magazine boxes but I did want to try sealing the cherry. We - my wife and I - were sending a miniature plinth for a friend that was so oily that we needed to seal it before putting my oil & urethane on it. Since I was going on a trip, my wife volunteered to do share the finishing for me. I have such an awesome wife.

We started by putting shellac on the plinth and the cherry magazine box. I gave the cherry magazine box a very light sanding them started putting the oil and urethane wiping finish on all of them. The downside of the wiping varnish is that the coats are so thin it take a lot of them to get a good coat. I got the first couple of coats before I left on vacation and my wife did the rest while I was out of town.

When I got back from my trip I rubbed the boxes down with kraft paper - brown paper bags - to remove the few dust nibs, filled them with magazines and put them on my shelf.

I'm pretty happy with how they all came out.

New boxes

New and old boxes (from right - Zebra wood, Walnut, Purpleheart, Walnut)


[This was originally posted in December 2016; however, the finishing work was done over the 4th of July 2016.]