Monday, March 28, 2016

Drum Sander


Drum Sander

My local Woodcraft store had a sale on Jet power tools a month or so ago and I decided it was time to buy the drum sander I've been saving up for. I didn't have quite enough money in the piggy bank but it was close enough that it wasn't worth passing up the sale savings.

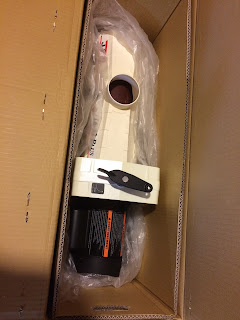
The tool comes in two boxes and each of them are pretty heavy. The guys at the store were nice enough to load them into my Forrester for me. When I got home I had my wife help me carry them downstairs. I could probably have managed on my own if I'd had to but why turn down help when it is handy.

Yesterday I decided to spend my shop time on putting it all together. I've been wanting to get it working since I brought it home but prioritized the dresser instead. I'd pulled the assembly instructions out as soon as I got it home but hadn't really read very much of them. Fortunately there wasn't really any prep necessary. It all went together pretty easily.

The instructions said to start with the legs so I started by unboxing the assembly stand pieces. Everything was very well packed. Each powder individual piece was wrapped in a separate heavy plastic bag to prevent scratches. Left to right, top to bottom the parts are: lower shelf, short rails, conveyor belt, legs and long rails.

The Assembly Stand parts
The first step was to assemble two legs to each short rail. Then attach the two leg assemblies together using the long rails.


The legs went together with carriage bolts and nuts, no washers. I considered adding washers but decided not to. If things ever loosen up these bolts are easy to access and I can just add washers and lock washers later. The next step was to flip the legs over and add the shelf.


Adding the shelf was a little more awkward since there wasn't anything to rest it on. I ended up sitting on the floor and using my knee to prop it up. After I got one carriage bolt in, the rest went together easy. Then I added the stem casters I'd purchased at Home Depot. They cost me $20 versus the $133 they would cost me on Amazon.


For the casters I dipped into my own hardware supply and added lock washers to make sure they didn't work loose. Next was flipping the stand upright and putting the motor on top.


You cannot see them in this picture but the motor has two pieces of plywood bolted to the bottom that keep it from bouncing around in the box. I'd definitely recommend keeping the motor box upright when moving it. I don't have a picture of it; however, with my wife's help we moved it to the top of the legs so that it sat crosswise from the pictures above. This allowed us to get to the hex bolts holding the plywood on.

After removing the plywood I spun it around so that it was on the stand properly and used the bolts that had held the plywood on to fasten the motor to the stand. I added washers and lock washers to these too.

The next step is to add the belt.


This went on pretty easy. Four bolts and it was on. The instructions mentioned that the belt had been over tensioned for shipping but didn't go into details on how to fix it. But never mind that! More steps to follow. I'd also purchased the accessory extension tables and it was time to put them on.


These came in a much smaller box and consisted of two U-shaped braces and two stamped steel tables. Shown above is unboxing the extension tables and attaching the U-braces. Next was adding the tables.


Hopefully you can see that there is a small gap between my level and the extension tables. The instructions say to level them so that they are just slightly below the height of the belt.


After leveling the extensions I set the tension on the belt, checked the sand paper and set the height gauge.


I couldn't find a good angle to get a picture of the height gauge. Its the shiny bit in the middle of the left picture. There's a tape measure on the front of the motor.

The first thing I thought when I saw the sand paper belt was, "What the heck! They wrapped it too loose?" Then I red the instructions on how to use the handy tool for manipulating the clamp that holds the ends of the sand paper to the drum.


Oh.

It is supposed to be that way.

The last step was to properly tension the belt and calibrate the height gauge. To adjust the belt the instructions said that the belt was too loose if hand pressure could make it slip. I loosened the belt and then tightened it in small increments until it stopped slipping. To set the height gauge I lowered the drum until it just touched the belt. Then I set the gauge to zero. Simple and done!

In Summary

I am super stoked. I work with a lot of thin material that can be quite challenging to flatten and smooth with a finishing planer. This tool should allow me to work with thin material that can - and has - exploded trying to run it through my planer. It will also allow me to work with figured woods that chip out in the planer.

I haven't done more than turn it on and haven't run any material through it yet but so far I'm really happy with the tool. The assembly instructions were clear. All the parts fit together without needing altering. The packaging was superb. They even wrapped a couple of wood blocks in plastic and wedged them under the drum for shipping. I wasn't surprised by the wood blocks but that they wrapped them in plastic! When I turned it on for a quick check everything ran smoothly and surprisingly quietly.

The kit came with additional bits that for other tools I would have had to purchase separately. It came with a height gauge measured in inches - and fractions - but they also included a metric replacement. They included one 80 grit belt on the drum and a few more replacement belts in a box. There's a special tool for helping fasten the sanding belt in the clamps. I was able to reach the clamp with a finger so I don't figure I'll ever use the tool but it was nice to have it included.

So far I am very happy with the purchase. If it works half as well as it went together it will be fine. If it works as well or better I'm going to be ecstatic!

Conflicts of Interest!

I do not have any. I do not have any financial ties to Jet, Woodcraft or any of the other companies I have mentioned in this post (other than I give them money and they give me stuff at fair market value). I purchased this tool out of my own pocket and did not receive any special discounts.

Sunday, March 27, 2016

Dresser, Part 5 - Polyurethane on the Carcass and What's Next

Putting Polyurethane on the Dresser

I took last weekend off from woodworking and mostly just putzed around the house. The Watco Danish Oil felt dry and smelled dry mid week but I waited until this last Thursday to start putting polyurethane on it. I got a second coat on it Friday and hoped to get two coats a day on it Saturday and Sunday. 

Unfortunately my Saturday morning coat wasn't dry Saturday evening so I only got one coat on it Saturday and today (Sunday) I didn't even try to get two coats. It's still pretty cool here and it's possible that I may not have thinned the polyurethane as much as I normally do. In any case it will take however long it takes.

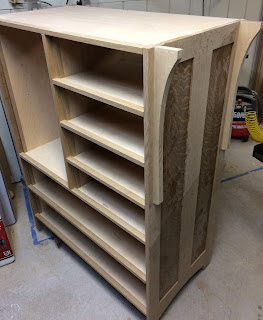
Getting to the bottom and reaching the top is a little awkward. The top of the carcass will be covered by the dresser top - which is yet to be made - but I want to seal it with polyurethane anyway. The plan is to finish covering the sides then I'll tip it onto it's back and put a few coats of polyurethane on the top and bottom just to make sure everything is balanced.

I'd thought that maybe I'd build the top of the dresser this weekend but instead I let myself get distracted. I spent a few hours Saturday in the workshop getting the drawer fronts sanded so they are ready to come up to the finishing room. 

At this rate, I'll probably have the dresser carcass finished this week and be putting Danish Oil on the drawer fronts and door next weekend. If they take two weeks to get covered I effectively have three weeks before I need to build the dresser top. There's also a shelf I need to build for the large opening. I've been putting that off as well because I don't want to have it sitting around taking up space.

No pictures this week. It pretty much looks the same as in my last blog.

The Next Project

As the dresser is nearing completion I'm debating on what I want to do for my next project. I'm kind of hoping it doesn't take five years like the Dresser did. Of the things I am considering is:
  • Freedom 17 - A cedar strip canoe
  • Router Table - Norm Abram's New Yankee Workshop
  • Short Dresser - A shorter version of my dresser to replace the dresser my wife is using
  • Workshop projects
    • Remove some cabinets to gain floor space
    • Build walls and additional lumber storage
  • Gaming Console Console - A cabinet to hold my gaming consoles
  • Step Stool Chair - A chair that converts to a step stool

Freedom 17

The canoe has to be a summer project. I will not be able to get it out of the basement so it is going to have to be built in the garage.  I'd like to finish it in one summer because it will be much easier to store as a boat than as a half-finished boat.  This summer will probably not be ideal since I will probably be looking for a new job come fall. I'd rather not have the distraction of a boat.

Router Table

The router table is somewhat higher on the list. A number of years ago I needed a router table so I built one in an evening. It's basically a sheet of plywood with some braces underneath to keep it stiff. It sits on top of a pair of sawhorses. It's convenient in that I could take it apart and regain the space it is using but it tends to just stay set up all the time. I'd really like something more mobile and more convenient.

Short Dresser

My plan is to make an entire bedroom set. I mentioned making the bedframe that goes with my dresser and nightstand to my wife and she said she'd rather have a new dresser before the bed. I'm a little sick of working with quarter sawn white oak so that's likely to wait for a bit.

Workshop Projects

I've got a few kitchen cabinets in my workshop that were probably moved down there when the kitchen was remodeled in the mid 80's. I'm guessing that is that case because my house was built in the 70's which matches the dark walnut stained cabinets in my workshop and I've got crappy mid-80's style cabinets in my kitchen. I've got a corner of the workshop that is inaccessible and not well utilized. What I'm thinking is if I rip out the cabinets I'll gain floor space I can use to put tools.

Half of my workshop has walls framed with 2x4's 16" on center covered with T1-11 plywood. The other half has bare concrete block walls. I'm thinking of framing and paneling the other half, putting in some additional lumber storage and maybe a workbench.

These might get done over the summer but I don't know if I want to commit to them just yet. They're going to take a little bit of time. Also, I think I might rather have some of the other things on my list first.

Gaming Console Console

I've got multiple gaming consoles and currently they are sitting on the floor. I'd like to get them up off the ground and into a proper piece of furniture. I don't have any pre-made plans for what I want so I'm going to have to design something myself. Since this piece will be going into one of the nicer rooms in my house I want the piece to be attractive; however, I also don't want to put a lot of effort into it. My plans are going to have to balance utility, ease of construction and appearance.

Basically I'm not quite ready to start on this yet.

Step Stool Chair

I've been wanting to make one of these  step stool chairs for a few years now. They really appeal to my frugal nature and liking of things that multi-task. From my experience they make a relatively uncomfortable chair and a slightly inconvenient step stool. 

I've got a friend - let's call her Heidi to preserve her anonymity - who isn't what you would ever refer to as statuesque. Okay, she's short. She also has rather tall kitchen cabinets. This confluence is perfect. I want to make one of these chairs, Heidi could use a stool in her kitchen.

I think this is what I'm going to make next. The construction doesn't look that hard so it'll be a good summer project as yard work and other outdoor activities start to take precedence. I'll be able to putter away at it whenever I have time. 

I started the process Saturday afternoon by transferring the design plans to paper with a one inch grid. I started by trying to follow the plans weird skewed angle and decided it was too annoying. I restarted aligning the drawing with the grid. Since the drawing was scaled 1/4" to the 1" I was able to use a ruler to measure offsets and transfer them to my sketch. As the plans say, there are only a couple of important things to get right. The angle on the two pieces needs to be consistent - 70 degrees - and the height of the chair needs to be such that top of the seat back rests on the ground when folded into the step stool shape.


I'm happy with how it came out, but... I should have started closer to the left hand side of the paper. I don't have room to finish the other half the stool. It isn't a big deal. I can just tape another sheet of large graph paper to the right hand side and span two sheets or I can transfer what I have to a new sheet and move on. I just haven't done one or the other because I was working on the floor and my back started hurting. And it was time to go play some Mass Effect 3 anyway.

I plan to draw out the other pieces then cut them out of 1/4" hardboard. I'll use the hardboard to trace the final pieces and as a template to use my router table and a pattern bit to get the pieces exactly the same.

Wednesday, March 16, 2016

Dresser, Part 4 - Race to the finish

Monday evening after work and before cooking dinner I put the Dark Walnut Watco Danish Oil on the dresser case.


I worked my way around the case working in sections. It isn't terribly important with the Danish oil to keep a wet edge but by working methodically in a pattern I could make sure I got all the surfaces covered.

You can see that I didn't put the oil on the inside of the drawer cases.They are going to be hidden by the drawers so why waste the oil. Also, I am a bit low on the oil and I'd like to finish this project on the current can. It will give me a better odds of having a consistent finish.

I pretty much follow the instructions for applying the oil. I flood the surface with the oil using a shop towel. I try to keep it pretty neat but you can see the dark stains around the feet which is why I covered the saw horses with felt. If any spots look like they have absorbed all the oil I'll put a little more on.

After thirty minutes I put a second coat on following the same pattern.

After another fifteen minutes, it is time to wipe off any excess. I basically take a clean shop towel and wipe down the entire piece. I do this until the surface doesn't feel sticky any more.

At this point the instructions say you can use the item after 48 hours of put a top coat such as polyurethane on it after 72 hours. I'll be giving it at least twice that.

All oil based finishes - at least the ones I know of - need to cure which is distinctly different from drying. Finishes which cure are undergoing a chemical reaction which is typically a temperature sensitive exothermic - puts off heat - reaction. The warmer the environment the faster the finish cures. This is why you should never wad up wet oily rags and throw them in a trash can. The oil starts curing generating heat which trapped by the wadding and garbage can causes the reaction to accelerate which generates even more heat and so on until something reaches the temperature where it will spontaneously combust.

Anyway, I'm very careful to dispose of my rags carefully so  I don't burn down my house but almost as important I don't know how fast the oil on the case is going to cure. Since it is a bit chilly in upstate New York right now I'm going to wait to make sure the oil is cured. If the oil isn't cured when I try to put the polyurethane on I'll just end up with a muddy blurry mess.

There's one more issue. Oak has really large pores which absorb the oil. Over the first few days the oil in the pores will leak out. If I don't keep going back to the project and wiping it down a few times a day I'll get a blotch wherever the oil leaks. I wiped the case down twice again Monday night. I wiped it down twice on Tuesday, once in the morning and once in the evening. Wednesday I overslept so I didn't have time in the morning but I'll wipe it down before I head to bed tonight.

So I am going to wait at least 72 hours after the oil stops leaking out and I consistently get a clean rag when I wide the case down.

Sunday, March 13, 2016

Dresser, Part 3 - The well laid plans of mice and men...

I started off this weekend with a few simple goals:

  • Get the dresser into the finishing room and get the Walnut Watco Danish Oil on it
  • Get the dresser top constructed
  • Get the drawer fronts finish sanded
Saturday morning my wife helped me haul the dresser upstairs. She's pretty strong but the dresser is also pretty heavy. I haven't weighed it yet but I'd guess it is over 100 lbs and quite bulky. With a little grunting - mostly from me, my wife is too polite to grunt - we got it upstairs to the finishing room without hurting ourselves, the house or the dresser. All-in-all successful in my opinion.

I'd already taken my saw ponies up to the finishing room and laid them out. Since I didn't want to get danish oil all over them - pools of danish oil tend to stay sticky - so I covered them up. The pink paper is actually underlayment for hardwood flooring. It isn't too expensive and it does a good job of absorbing spills. I use it to cover my workbench when I am doing glue ups.


Before carrying the dresser upstairs I'd brushed the bulk of the dust off the dresser and after getting the dresser upstairs I wiped the dresser down with mineral spirits. This does a few things: it gets the last of the dust off, it highlights the grain and it helps me find places that need a little more sanding. Mostly it gets the last of the dust off. You can see from the towel I used how much dirt and dust I got off the dresser.


Next was just tipping the dresser onto the saw ponies. I originally thought I'd leave it on its back but I was worried about reaching the back. After I lifted it upright I realized I could still reach everything I needed to and additionally I would not have to reach over the sides to get to the insides.


After wiping a project down with mineral spirits I like letting it sit for 24 hours to let the mineral spirits finish evaporating. I don't want to risk polluting the finish I'm putting on over it. This means the dresser case needs to sit until Sunday. My style of finishing takes a lot of clock time but very little personal time. There is a lot of sit and wait - or in my case go do something else.

To the workshop!

As I was heading down to the workshop to make the top of the dresser my wife reminded me I was going to make a wooden plinth/base for one of her miniatures. So I futzed around with figuring out what I was going to do for her and then promptly forgot to take the wood blank down to the workshop with me. I found it when I came back upstairs for dinner.

Then when I got into my workshop I saw the start of the 3D printer enclosure I'd started earlier this week. That distracted me yet again. Building the enclosure was kind of fun since I didn't have a plan and just worked it out as I went. I made pretty good progress Saturday afternoon until I had to quit and clean up for dinner.

Sunday when I got back in the shop I finished the door that goes on the right hand side. I wanted to try a couple of things I don't do very often so I made the door with half lap joints. I put a dado around the inside of the door frame then used stops I nailed in place to hold an MDF panel in the door. I did this so if my friend - we'll call him Tyler to preserve his anonymity - ever wants to put glass or plexiglass in the door he can replace the MDF panel.


It looks great for being made out of spare parts I had lying around and no real plans. I had three 1"x3"x8' pine and a 4'x8' sheet of 1/8" MDF. There's only one problem. I made it using the outside dimensions of the table the printer is sitting on and the height of the printer. When I double checked my resulting inner dimensions the box is about 3/4" not deep enough. The printer will fit behind the front sliding doors but not within the footprint. I think I can make it work by giving my friend 'Tyler' a base to lift the printer over the lip created by the sliding doors.

The Plans!Parts, ready for delivery!

After I finished the enclosure I whipped out a base for my wife's figure made out of red oak. It basically just consisted of cutting it to size then running it past a router to shape the edges. It ended up a little bigger than my wife wanted but it'll do.

How'd I do?

I got a lot done this weekend, but almost none of the stuff I'd planned. Of my goals I got half of the first one done. My woodworking is much like going grocery shopping. You start off with a list and then halfway through the store you remember that you needed yogurt and something for dinner tomorrow night so you pick those things up too.

I got my wife's base done so she can enter her mini in a competition at Adepticon. I finished an enclosure for a 3D printer for my friend. I did get my dresser upstairs and cleaned up ready for the danish oil. I'm not too bothered by not getting the rest of the dresser work done this weekend because there is going to be so much waiting for finish to dry over the next few weeks that I'll have plenty of time to do the other stuff. I'll probably do the Danish Oil tomorrow night and it'll be fine.

Friday, March 11, 2016

Dresser, Part 2 - Dresser Drawer Fronts

My goal for this last weekend was to get enough progress that I'd be able to get the dresser carcass into my finishing room. Since my finishing room is separated by two flights of stairs from my workshop I didn't want to have to schlep drawer fronts up and down stairs when tweaking them to fit nicely with even spacing.

Long story short, I didn't accomplish my goal. I spent a few hours selecting the boards for the drawer front and cleaning them up and I got the front and back skirt shaped and finish sanded. It was right about this point that I remembered my copious glue use on the saw ponies and that I had finished off my last bottle of Titebond III. I got close but I wasn't able to attach the skirt boards.


I had a free evening tonight so after an hour of Mass Effect 3 and then watching the Daily Show with my wife I got down into the workshop for a few hours of work. I cleaned up the mess left from jointing the drawer fronts, glued the two skirt boards onto the case and started another small project.


The blue tape you see is holding on the off cut from cutting the arc on the rail. Using the off gives me a flat surface to use the clamps. The back rail doesn't get a curve and is clamped the same way.

The next question you ask is, "Why did it take you all weekend to cut out the drawer fronts and why are you starting another project?" Well, that's actually two questions and my normal policy is one question per post but I'll make an exception this time.

First, why did it take most of a weekend to cut the drawer fronts. Well, to make a short story long, the bottom two drawers in the dresser are 8" wide by 36" long. I wanted to make them out of a single board with good figure across the entire drawer front I needed to find a pretty special board. I actually ended up finding two boards that each had a long enough section that had nice figure for most of the width. So, looking over my available boards and deciding which section I was going to take took more than a trivial amount of time.

Next the boards were 5/4" thick which is both good and bad. It's good because it gives me lots of thickness to work with to get the board flat and straight. It's bad because that means I need to remove 1/2" of material to get it down to the 3/4" thick the plans call for. Most of that gets done at the planer and since I only remove about 1/32" at a time, that ends up being a lot of passes through the planer.

But that's not all! My jointer is only 6" wide. There are a coupe of techniques to flatten one face of a board that is too wide for your jointer. One is to use your planer. Unfortunately if the board is warped when you put it through the planer it will come out the other side smooth and warped. To make it work you build a sled - either temporary or a slick adjustable one [For example, this one].

I tend to go ahead and use my jointer. This technique is to take a deep swath ~1/8" in a single pass. This leaves a lip on one side of the board. If the lip isn't too wide I'll use a hand plane to take it off. In this case the lip was 2" wide by 36" long in white oak, much more than I wanted to hand plane. What I do in these cases is put a support board on the flat part and then put them through my planer. Once the opposite side is flat I flip the board over and plane the lip off.

Then it is a matter of planing the boards to 3/4". I stopped when there was about 1/32" left on the long wide boards, cut, jointed and planed the small drawer fronts to about the same thickness then passed all the drawer fronts through the planer. This gets them all to be exactly the same thickness. It's probably irrelevant for drawer fronts but it is good to follow this process when shaping similar boards.

I hope you can see, cutting the drawer fronts was a little more work than just cutting a board to length. In summary it was:

  • Find the right board(s)
  • Cut the lengths I wanted to use
  • Joint board
  • Use the planer and a carrier board to make one side flat
  • Flip the board and remove the lip
  • Use the planer to remove ~1/2" material 1/32" at a time.

So, the new project I started. A friend of mine just got a 3d printer and he just started printing with ABS. Apparently ABS needs to be kept warm throughout the printing process. His printer has a heated bed so all he needs is an enclosure around the printer and the bed will keep the air warm enough to print ABS. I had some space 1x3 pine and some 1/4" MDF so I am making him an enclosure. It'll take me a few hours to do; however, in the big scheme of things it won't be too bad.

Oh, and I almost forgot... I made little steps for my cat over the weekend. The poor thing is about twenty years old and is getting little arthritic and cannot jump up to the couch anymore. Her solution is to sit next to the couch and meow until someone comes and lifts her up. I'd made a jumping box for a friend's dog a few years ago, I got it back when my dog needed a little help jumping into the back of the Forrester. We put that next to the couch but it was still too high for her so I made some shorter steps out of the scrap plywood from the saw ponies I made two weeks ago.


My goal for this weekend is to:

  • Get the dresser into the finishing room and get Walnut Watco Danish Oil applied
  • Get the drawer fronts sanded
  • Construct and sand the top
If I get all that done I'll have the bulk of the construction tasks left and just have finishing left.

Saturday, March 5, 2016

Dresser, Part 1 - Picking up from where I left off

"So what's with this dresser you keep talking about but don't ever show any pictures, and why do you start every blog post with a question?"

Those are both good questions but the quota is one question per blog post.

The plans for the dresser I'm working on came from a set of bedroom furniture plans in Wood magazine. The dresser was featured in issue 160 December/January 2004/2005.
Image property of Wood magazine.
My wife and I could be described as frugal when it comes to buying furniture. Our bedroom furniture is bits and pieces we've picked up from family, friends, ex-girl friends, etc. I got this desire to build all my own furniture and these plans really caught my attention. I started with the nightstand because it was smaller and I needed one.

I liked the look of the nightstand but I also wanted to make some changes. The nightstand as designed had an open bottom and I wanted to keep my clutter out of sight. The nightstand plans are basically two frame and panel sides with a bottom, a drawer and a top. To fit the door, I used the same technique as the dresser which is to build a carcass out of plywood, then glue the frame and panel sides to the plywood box. I kept the same dimensions but completely redesigned the inner construction.


So about five or six years ago I started the dresser. As I explained on other posts a number of life factors got in the way and I was unable to devote time to working in my work shop. A recent project to build legs for a friend's gaming table inspired me to get back into the shop and finish the dresser.

Here's the state it was in three months ago.


Doesn't look like much does it. It's basically a plywood box with the front edges covered in solid white oak. The plywood back is leaning on the box but it isn't attached yet. The loose boards stacked on top are the pieces to make the drawer boxes. Behind and to the right you can see the rough lumber that will become the rest of the dresser.

This is basically where I picked it back up. The case plywood frame has been put together and edged with white oak, the drawer parts had been rough cut and thicknessed and the panels for the sides and door had been resawn and stained.

The next step was to put the panels into frames for the sides and the door.


In the picture of the door glue up you can see how I used F-clamps to help make sure the joints lined up. The swatches of blue is painter tape where I marked the center line of the center stile and the top and bottom rails.

The side panels were glued up the same way. In the picture on the right I am gluing the corbels onto the sides. If I remember correctly I eyeballed the position when I glued the corbels onto the nightstand. I'm pretty good at judging the center of things by eye but I decided for the dresser to make a spacer to help make sure the corbels were straight and centered.

Then it was a simple matter of gluing the sides to the carcass. I say simple but I actually put a lot of effort into making sure this step went without a hitch. If I made any serious mistakes in gluing the pieces together I would have to scrap hundreds of dollars of material and dozens of hours of work. Fortunately everything went well.


The next step I took was to build the drawer boxes. They'll get false fronts added so they look pretty plain right now. I made these out of Poplar. I really like working with Poplar as it is inexpensive and cuts very easily. The one downside is that of all the woods I've used Poplar seems to be the most likely to warp and twist when I cut it. Fortunately the drawer parts sitting on top of the dresser for five years don't appear to be any the worse for it.


And this is where it is at today. My plan for this weekend is to cut the false fronts for the drawers while the dresser is still in my workshop because it will be easier for fitting them to the openings. I also need to cut and add the front and back skirt. If I have time I'll start on the top.

Then I'm going to move the dresser body to my finishing room to start putting Watco's Danish Oil on it. It only takes an hour or two to apply but then it takes at least a week to cure fully. I'll probably give it two before I start putting on the polyurethane.

Thursday, March 3, 2016

Saw Ponies


I can hear everyone now, "You start your blog and then you disappear. Where have you been, how is your dresser going?" Well for a quick recap of the last month or so, the dresser is moving along. I've gotten the sides attached, the door made and the drawer boxes made. I'll put a post up on the dresser - with pictures - soon.

I have been busy in the workshop though. As I mentioned previously the dresser has moved from being a plywood box to looking like an incomplete piece of furniture. The next stage is to cut the drawer fronts and then start putting finish on the carcass. I do have a finishing room - more of an office that I do finishing in - but most of my work fits on top of a couple of saw horses. This will not work for the dresser for two reasons: first it is too heavy to lift up onto the sawhorses and most important, it is too large. If I did get help to lift the dresser onto the sawhorses it would be too high for me to effectively put the finish on it.

What I really need is something shorter than a sawhorse but still tall enough so that I didn't have to stoop down to the ground to get the feet. I've seen a number of plans for short rolling carts that intrigued me; however, since my finishing room is also my office I really didn't want to have a bulky shop cart taking up space. Going back through my magazines and doing a little internet research - googling - I came across plans for some short sawhorses (saw ponies).

I got these plans from Woodsmith Shop magazine. They featured them in the TV show in episode 404. You can get your own copy from Woodsmith Shop Episode 404. You may need to create an account or sign in.

A couple of years ago I traded in my Chevy Silverado 1500 for a Subaru Forester. The Silverado (and other GM vehicles built on the same platoform/model) had a small defect where the anti-lock brakes would corrode and stop working appropriately. But now I don't  have a convenient way to transport full sheets of plywood anymore. I have a friend, we'll call him Garrett to preserve his anonymity who has a truck and also wanted some saw horses. We made a deal, he helped me pick up plywood and I'd build him a set of saw ponies at the same time I built mine.

So, long story short I'm building eight of these not just four.

The plans are pretty straight forward and building the sawhorses went pretty easy. I started by breaking down two sheets of plywood in my garage. I have a worktable that I can set up but it takes a bit of effort so I just threw a couple of pieces to 2"closed cell foam on the garage floor and laid the plywood on top of that. The foam gets a little chewed up but the convenience makes it worth while.

I started by ripping a 17" swath off of one side of two pieces of plywood. These were destined to become the legs. To make the wider remaining pieces easier to get into my basement workshop I crosscut them to make four 31" x 48" pieces. If I'd been a bit smarter I would have ripped both 17" pieces from one sheet and saved the other one as I'll explain in a little bit.

Per the plans I made a template for the sides out of 1/4" hardboard. While I was laying it out I also marked screw holes and the locations of the dados and rabbets. I made a number of test cuts to make sure the legs would stack properly.
Test pieces
The template - if you look closely you can see my layout lines.

After I was happy with the leg template I used to trace out the legs then used a jigsaw and band saw to cut them to size and shape. The next step is to use the hardboard template and a router table with a pattern bit to get the lets to match the template exactly. The plans suggest using carpet tape to hold the template to the work pieces when doing the routing but I wanted a more solid connection. I pre-drilled the screw holes in the template then used 3/4" wood screws to hold the template to the leg.

Shaping sixteen legs was a bit boring but I got through it all in one session.

I then set up my table saw with a dado blade and spent a little time to tune it to be the same width as the plywood. And by a little time, it took me somewhere between half an hour and an hour. Once I was happy with the size I used the hardboard template to set the fence and then cut the dados and rabbets.

The next step is to cut the shelf and top of the sawhorse so I swapped the dado blade for a standard crosscut blade. In the process I saw some plywood leaving against my shop wall that I had miscut for another project and decided to use it for the other plywood parts. In the end this worked out relatively well except that I still have the larger squares of 31" x 48" plywood. Oh well...  They will be more useful than the smaller pieces I re-purposed. The other issue is that my older plywood was a little thicker so I hat to recut my dados in the sides. I also used the template to drill all the holes in the sides.

After cutting out the shelves, tops and braces I then spent a few nights assembling them. I used copious amounts of glue and lamented at the low quality of plywood.

Parts all ready to be assembled
First two saw ponies


Why the lamentation? Well, I think it is partly that I am used to high quality cabinet grade plywood and for these saw horses I used construction grade fir plywood. The plywood had a large number of voids and other flaws which made screwing the parts together a little more challenging. I don't think buying inexpensive plywood was a bad idea. Making saw horses out of high quality plywood would have made them cost more than store bought.

The other challenge I had was that when I laid out the screw holes I didn't account for the dados in the top and shelf. Effectively instead of having the screw hit the middle of the 1/2" of material that was left the screw hold was 3/8" down or only 1/8" above the dado in the top and shelf.

However! Regardless of the quality of the plywood and my errors with the screw holes the saw ponies are all assembled and are plenty strong. I wouldn't dance a jig on one of them but I did climb up and stand on one. They will be plenty strong for my purposes.

I hope Garrett is as pleased with his saw ponies as I am.

All done!