Sunday, November 17, 2019

Hexagons, Part 3 - Milling the columns

Step 1: Rough milling

The first step to any woodworking project is to break the purchased boards down into slightly over sized parts. These parts are left to acclimate to shop humidity and temperature. Once they've had a chance for all the tensions to balance they get run through the jointer and planer process again to reflatten the boards.

To be honest I typically eschew this process and just straight to finished sizes and if a board warps too much I make a new one. I am going to make an exception for this project since the precision and more importantly the consistency is extremely important.

I'm going to put a border around my hexes so I'll also mill some 1/8" thick walnut strips. I'll need enough to cover all the faces so that's 114 linear feet of 1" wide strips. If I can get a thick enough walnut board I'll just rip them off 1/8" at a time.

Step 2: Set the final height of the hexagons

At this point I have a stack of 8/4 maple boards that are of various thicknesses. The first step is the pare them down to the finished thickness. You can be as exact in this step as you want. If you are a touch compulsive feel free to be super precise. If you are more of the wild-and-free sort feel free to be a little sloppy. The rest of the process will result in a perfect hexagon regardless.

Whatever the thickness you have coming out of the planer at the end of this step will be the final height of the hexagon column.

What is most important is that after this step the planer should not be adjusted again until all the hexagons are completely finished. The planer height is defining the height of the hexagon if it gets moved your hexagons will not go together evenly.

Step 3: Making the boards hexagonal

At this point I have my boards flattened and the final height set. The next step is to transform these boards into hexagons. I use three tools for this step: Planer, Table Saw and my Wixey Digital Angle Gauge.

What is most critical is that the height of all parallel faces of the hexagon are identical. It is is slightly less critical but still important that the angles on the sides are as close to 60 degrees as possible.
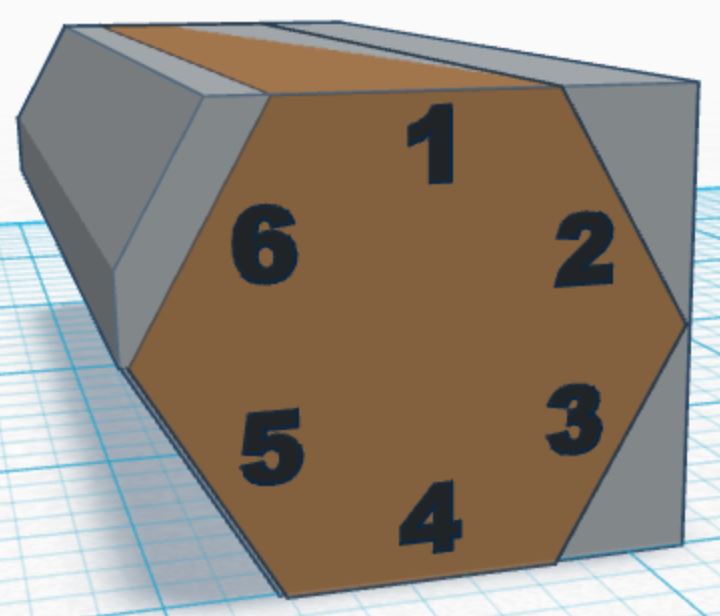
Figure 1: Reference hexagon

Step 2a: Clipping the corners

I use my Wixey Digital Angle Gauge to set the angle on the table saw blade to 60 degrees. I suppose if you didn't have one of these you could use a drafting square. I do have one so I use it.

I set my fence to take a little bit off the corner of the blanks. I flip the work piece upside down and to the same to the other corner on the same side. I keep creeping the fence inward until the two sides - 5 & 6 - meet at a point.

Step 2b: Finish the hexagon

The next step is to set the table saw fence to complete the hexagon shape. I also make sure sides 1 and 4 are a little longer. I aim for between 1/32" and 1/16" extra to take off later. The goal is to not cut the blank too small but not leave more than can be removed cleanly in a single pass in the planer in the next step.

Use sample pieces to dial in the correct fence settings.


My example image shows the rough blank being the perfect size to minimize waste. In practice I normally make the rough blanks extra wide to make sure I get a full-sized hexagon. Better to have a little more waste rather than waste the entire blank.

Step 2b: Notes

  • I mark my blanks with numbers on the end as shown in the images above so that in each step I an working on the identical face on each blank.
  • If your blade isn't at 60 degrees exactly, that's okay so long as you keep you blanks oriented identically. i.e. when gluing up butcher block always have the '1' face pointing towards the same side. This works because the angles will be complementary.
  • Lock the angle adjustment on the table saw blade as you don't want to change it until you're done with making all the hexagons.

Step 3: Plane Perfect

This step makes the hexagon heights all consistent. Send the blanks through the planer to clean faces 2 & 3.

Step 4: Adding borders to the hexagons

We've got perfect hexagons now but we have to mess them up in order to add a border. To provide a border around our hexagons we're going to add veneer to the outside faces. Then when we cut the column into shorter segments and line them up we'll have a nice hexagonal pattern with borders.

The process is to shave a little off the hexagon with the table saw to make room for the veneer, glue a strip on, then clean up using the table saw and planer. Then repeat.

Reset the table saw fence so that the blade trims a little bit off of one face of the hexagonal column. It doesn't matter how much you trim it just needs to be less than the thickness of one of the strips you cut in step 3. However much you trim off will be the thickness of the border.

Do not adjust the table saw fence again until you're done. Since my fence will slip if I put enough pressure against it, I plan to add additional clamping to keep it from slipping.

Step 4a: Trim off one face


My image shows me starting with face 5 but really any face will work.

Step 4b: Veneer

The previous step made the hexagon slightly shorter in one dimension. Now we add a strip of veneer to make the hexagon slightly taller in that same dimension.


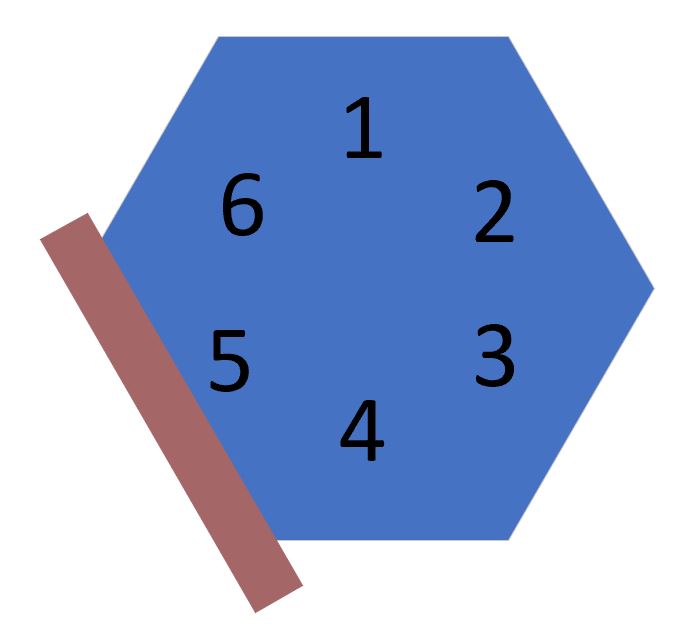
Step 4c: Cleanup veneered side

This step brings us back into a perfect hexagon shape again. We use the planer to bring the height of the hexagon back to the correct height. Using our initial face as an example we pass the column through the planer with face 2 down and face 5 up.

We then need to clean up the veneer tabs sticking out to the sides. One of them we'll clean up using the planer. The other one we'll get when we trim the next face for veneering.


Step 4d: Rinse and Repeat

Rotate column and repeat steps 4a-4c until all sides are veneered.


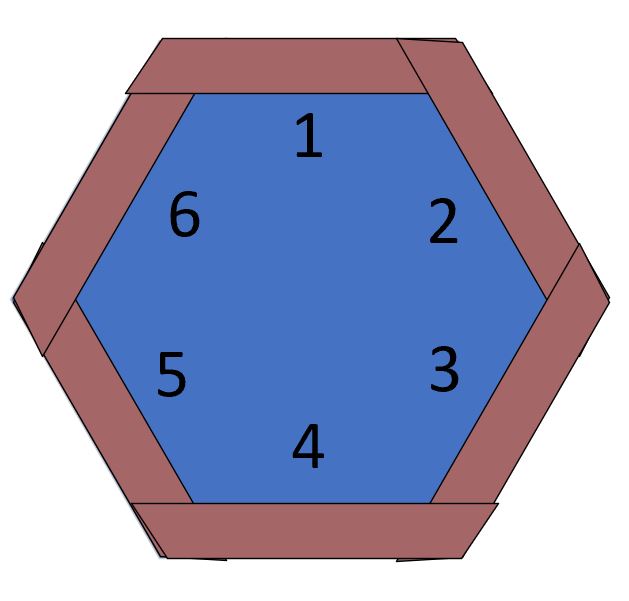
Step 5: Cutting slices

Now it is just a matter of cutting slices off the hexagonal column. I'm going to make a custom sled that cradles the hex column to reduce tear out.


Summary

So I've got plans for how to make my table top. I've worked through the design steps. What I don't have is the base that holds the table off the floor. I'd like to carry the hexagon theme into the base. Maybe I'll make the legs hexagonal...

The table needs storage. I haven't decided how much, or what form.

But at least I know how I'll make the top.

Wednesday, November 13, 2019

Tire Rack

My wife and I live in upstate New York. We get snow every year. Sometimes lots of snow. A few years ago when I bought my Subaru Forrester I decided to get snow tires for it. Snow tires are an extra expense; however, while I am putting miles on my snow tires I am preserving my summer tires, and vice-versa. Basically there is an upfront expense of having two sets of tires but the long-term expense is about the same.

For the first few years I kept the snow tires stacked in the back of my garage and that worked okay. Then my wife decided to get snow tires and I went from having one set of tires to store to needing to store two sets. It got a little messy.

This year I remembered that I am a woodworker and am particularly suited to solving this kind of problem. My garage has an addition on the back that has just been storing junk.


As you can see, quite a mess.

The first step was clearing out the junk and measuring the space. There was just enough room to fit four tires standing on edge. Next was coming up with a design. I looked around on the internet for inspiration and sketched out some ideas and came up with the following.

The sides are half lapped joints glued and screwed. The rails are just screwed into place in case I ever want to move it or modify it. All parts are made from 2"x3" pine.

And best of all it fits all my off-season tires.

The half lap joints were probably excessive. I used my router to form the joints on the leg verticals which was a lot of work. I probably should have removed the bulk of the material using my circular saw and then cleaned then up with the router; however, it's done now. I'll know better for my next tire rack.

New Yankee Router Table


So I know it looks like I haven't done any wood working over the 2018/2019 winter; however, I got a fair bit done. I've not posted anything because I decided that rather than posting every time I made any progress but to wait until I was finished and then post once per project.

Last winter I decided my big project would be building the router table you see above. Construction went pretty quick but I got stalled when I reached the step using contact adhesive to attach the laminate. Contact adhesive is pretty nasty stuff. The dangers and warnings printed on the can convinced me to wait until the outside weather would permit me to do the gluing in the garage. Unfortunately a day didn't come until June where the temperate was over 65 degrees and I had time free. By then I was in full  summer swing

Fortunately in July a friend of mine asked if I could do a small woodworking project with his fourteen year old daughter. This was fortunate because - lets call her E to protect her privacy - was a great study and was being very safe in the workshop so when she was doing tasks that didn't require direct supervision I could work on my router table.

But back to the router table...

I constructed it pretty much to Norm's Deluxe Router Station plans; however, I replaced the low-tech router plate with an Incra Mast-R-Lift-II-R that I ordered from Rockler Woodworking. I also added casters with quick release plates and a combination miter track and t-track by Rockler.

The Router Table

The plans are very good with lots of drawings. I didn't buy the episode video so I was basing my general assembly plans on what I remembered from seeing the episode once or twice years ago. I also kind of just made my own construction order.

The plans had all the measurements needed and I found no errors.

I wasn't able to find the exact same dust collection attachments that Norm used but I was able to make a similar item from Woodcraft fit the fence. I didn't like the 2-1/2" fittings for the back of the router so I designed a dust collection port and had a friend 3d print it. 


It looks great and works awesome. At least until I bumped it with my knee and the 3d print broke right on the lamination. My friend has said he'll print me another one with 100% fill versus the 10%-15% fill of the one I have. Regardless it still works and if it fails before my friend reprints my dust port I'll make an adapter out of wood.

As previously mentioned I bought a router lift which ended up being a different size than Norm's plate. Since the Incra lift doesn't have the router centered on the plate I did a little math and figured out where the router bit would have been in his table and shifted the position of the lift to get my router bits in the same place.

Fortunately I had all the t-nuts and star knobs necessary for the fence already in my hardware collection. I didn't manage to find anywhere local that carried high-pressure laminate but Home Depot was willing to ship it to me at no cost so I mail ordered some from there.

All the grooves and slots in the router table top were made by attaching custom router template guides with double sided tape. I've not done a lot of this kind of template routing so I was a bit nervous but I took my time, double checked each step and it all worked out fine.

The Incra Mast-R-Lift-II

So why'd I choose the router lift I did? Well, I read a whole bunch of router lift reviews and they all spoke glowingly about all the lifts and then each picked a different "Best".  What I took from this was that what differentiates the router lifts was small features unique to each but that they all worked well.  Since I don't have any experience with router lifts I figured I could keep going back-and-forth about one feature over another or I could just make the best decision I could and pick one. The Incra works with the Porter Cable 7519 I already owned right out of the box so it 'won'.

The Incra Mast-R-Lift-II is a heavy piece of hardware. It's fit and finish looked great coming out of the box. The lift can be configured for a number of different router sizes without the need for any special collars. Installing the router is simple except for the need for setting the router close to but not actually touching the top. I used a couple of thin shims to get a consistent spacing.

Other than a slight hiccup in one corner I was able to get the router plate fitted without any drama. The drama came when I wanted to use the router table to put the t-track slots in the fence pieces and I found I could not lower the router to get enough of my 1" bit below the surface. What's the use of a router lift that cannot get a relatively short bit below the surface of the table. Then when trying to diagnose the problem I saw that the router lift was in the middle of its travel when the router was hitting the top plate. I just needed to raise the lift to the top before installing the router. Now aside from some chagrin that I must have missed a setup step everything is fine.


So far I've done a couple small projects on the router table and I love being able to change bits without needing to pop out the entire router and plate. It came in handy making the fence where I needed to route a groove with a 3/8" straight bit then without changing the fence route a t slot. I also love the precision the router lift gives me for tuning the height of the bit.

Summary

I love my new router table. It solves my biggest issue with my temporary table which was that it was taking up floor space. While my temporary table was designed to be able to be setup and taken down I never did. Since it was on saw horses it was very inconvenient to move when it was in my way. The fence was locked in place by a pair of clamps which wasn't terribly inconvenient but it did keep a pair of clamps tied up.

My new router table rolls around my shop withe greatest of ease. The only downside is that to click the wheels into the down position I need to lift the table. This is currently a pretty large downside. Since the top is only attached by gravity I cannot lift it by the top. The sides are pretty smooth and don't give any purchase for lifting. I need to add some kind of handholds so it will be easier to transition. So far I've found it easier to just keep it on the wheels.


My old fence just had an opening I'd cut into it. The new fence has adjustable sliders that allows me to control the size of the opening. I've found the star knobs to be about as convenient as the clamps. The one downside with the laminate top being slick is that I need to really crank down hard on the knobs to keep the fence from slipping under moderate pressure.


The drawers and trays provide plenty of space to keep all my spare router pieces and bits and gives me plenty of space to expand into.


The router lift was the most expensive part of the table but so far I am super happy with it. The ability to adjust the height in very small increments above the table saves time and increases precision. Being able to change bits without take the router and plate out of the table is also pretty awesome!

I've lost track of how much time I spent on the table but I'm guessing it was a few days of work putting the carcass together and then another couple of days building the table and fence.

All told I am very happy with how this project came out and while the components I chose to put into it made it expensive I feel they will be worth while in the long run. I would recommend Norm's plans to anyone wanting to build a full cabinet router table.

Also...

Since apparently everyone on the internet likes cat pictures, here is Heimdall doing some exploring of the router table in progress.


Kubb

I was introduced to Kubb this summer at a company picnic.

Kubb is a Swedish yard game that involve throwing sticks at blocks of wood. There are actually nation championships with official rules; however, the "sport" is new enough that there is a lot of variation. For example, the regulation size field is variable as is the size and weight of the game components. If you are detail oriented like I am this could cause you a conniption fit; however, taken another way you can see that this allows you a lot of flexibility to make your own version of the game and no one can tell you you are wrong.

I took my kubb set dimensions from the USA National Championship rules. This is also a good place to get a set of rules.

Kubb game components are:


  • Ten kubbs that are 7 cm x 7 cm x 15 cm
  • One king that is 9 cm x 9 xm x 30 cm
  • Six batons that are 4.4 cm diameter x 30 cm
  • Four corner stakes
The USA National Championship rules specify a weight and not a wood species. I made some samples our of fir and found that they were the right weight so I made mine out of a couple fir 4x4s.

It's right about now you are asking yourself, why do I need instructions on how to make rectangular blocks of wood? 

Well, you probably don't.

That said...

I used two and a half 4x4s to make two sets. I'm going to give one away as a gift and keep the other one for myself. The side benefit is that by making two sets I am able to sort the pieces into a better set and a "worse" set. By worse I mean pieces that were slightly miss cut or that have a lot of sap in them.

Typically you'd think I'd give away the better set but since I'm most likely going to be giving the gift set away in a white elephant exchange where even the poorer set will be far better than what anyone else brings I feel it is appropriate.

Anyway, because I don't have any metric measuring devices I started by converting the metric into imperial units. This gave me the following dimensions:


  • Ten kubbs that are 7 cm x 7 cm x 15 cm
  • One king that is 9 cm x 9 xm x 30 cm
  • Six batons that are 4.4 cm diameter x 30 cm

  • My next step was to break down the 4" x 4" x 96" into 15" lengths. I ran them through my jointer and planer to clean them up. I then picked out ten of them for making kubbs. These I ripped down to slightly more than 2-3/4" x 2-3/4" then planed them to exactly 2-3/4" square. After this step it was just a matter to cut them to length.

    My next step was to make the batons. I took a few of the blanks I'd cleaned up and split them into quarters using my table saw. This resulted in batons that are around 2-5/8" diameter vs 2-3/4" but, "Hey, it's just a yard game. You're probably going to play it with a beer in your off-hand." I was able to use some of the lengths of 4x4 that had blemishes. When I quartered them I just tossed the parts that were a little too rough.

    I wanted to make mine round but I don't have a lathe nor do I have a round over bit that's 2.2 cm radius. I decided to make a jig that would allow me to rotate a square blank over a router bit in my router table. With the square blank a consistent distance from the table the blank would end up round.

    Suffice it to say it didn't work. The holes I cut to rotate the blank in were not tight enough so the blank slipped a little. Also, I should have trimmed the corners to make an octagon so the router would be removing less waste. In the end it seemed like a lot of work to get a mostly round blank that would still need  more clean up.

    I thought about using a hand plane to round the batons but then I figured I'd try first clipping the corners to make octagons. They felt pretty good so I use my stationary belt sander to smooth out the faces and round the sharp corners. This is my concession to, "Hey, it's just a yard game. You're probably going to play it with a beer in your off-hand." After clipping the corners and sanding them I used my table saw sled to trim one end of each baton and then cut them to length.

    I left the kings for last because I had cut some extra blanks and since the kings are bigger I could always cut them down to the smaller size if I needed to replace a kubb or baton blank.

    When jointing and planing the king blanks I kept them as big as possible. They came pretty close to the 9 cm size. I cut the crow in the top by setting my left-tilt table saw blade to 22-1/2 degrees and my fence to 5/8". The top of the blade was also 5/8" above the table. To cut the crown I really should have used a tenoning jig; however, I just held the blank near the top and was careful to not let the king bind. I then readjusted the fence so that I'd finish the cut for the crowns. I got my alignment by setting the king against the fence and looked through the initial cut to make sure the blade was lined up.

    To cut the neck around the crown I left the blade setup the same. I used my fence and a miter gauge to make the initial cut. To get the second cut I had to move the miter gauge to the right hand slot and use a stop block; however, I aligned the cuts the same was as I did for the crown by sighting down the initial cut to see the saw blade.

    With all the parts cut I used my stationary belt sander to smooth out all the faces and soften all the corners and edges. This took a while as with two sets I had ten batons, twenty kubbs and two kings.

    Out of the scraps I did make stakes to outline the playing field and a miniature king. My plan is to use some paracord to form a triangle that outlines half the playing field. The triangle hypotenuse would have the king tied in the middle and would be the diagonal across the field. The two sides of the right triangle would form one sideline and base line. The lines could then be picked up and flipped around to form the other sideline and baseline. The king marker would also mark where the full sized king would go. I also thought making a little small scale king would be fun.


    Overall

    My sets took me about a day to get through it all. I did it over several sessions so I'm not exactly sure how long it took; however, about a full workshop day seems about right. Why so long? Well, there was a lot of sanding of a lot of parts. I didn't even sand them to a super fine finish. I mostly just tried taking the sharp corners off of everything.

    Would I do it again? Maybe...  but I have a set now so I don't really have a reason to do it again. Would I recommend someone else make their own set? That's more complicated. I've seen sets on etsy sell for as much as $170 USD. I've also seen them sold on other websites for as little as $30. My sets cost me about $15 each but taking in the day or so of effort I don't know if I really saved anything. I guess if you are looking for a project that doesn't require a lot of fiddly precision or you want to give it as a gift and want the personal touch it isn't a bad project. If you are looking to save money, just go buy an inexpensive set on Amazon.

    Pet Gate Design, part 1

    In my last blog post I showed off my new pet gate - for the cutest puppy on earth.


    I figured I would share the steps I went through and what calculations you might need to make your own gate.

    Step 1: Determine the height of the gate

    This is probably the easiest step. Figure out where you'd like the top of the gate to be and then measure to that point from the floor.

    I wanted the top of my gate to be high enough that I could reach the top comfortably with an outstretched arm without requiring bending over. That was about the same height as the chair rail in my dining room so I picked that height which is 35" from the floor.

    There's a small bull nose baseboard trim in the door opening that I figured it would be easier to just avoid versus trying to remove to make the gate swing closer to the ground. That sets the bottom of my gate about 3" from the floor.

    Step 2: Measure your opening

    The second step in knowing the size of your gate is to know how wide the opening it needs to fill.

    You could use any number of super accurate techniques; however, I found a normal tape measure to be sufficiently accurate. Since no house is square or plumb it is smart to measure the width at multiple points between the bottom and top of the gate location. It would also be a good idea to check the openings for plumb.

    I got lucky and found there was only a 1/8" difference in width between the top and bottom of my gate opening. That's small enough to just ignore or average into the gaps I'm putting into the design anyway. As an additional bonus I found that the wall I planned to mount the hinge onto was plumb.

    My gate opening is 39" wide.

    Step 3: Determine the gate final dimensions

    Unfortunately there are a lot of dimensions to calculate. It is all simple math but we need to get a number of parts calculated and many of the parts are based off the size of other parts.


    The overall gate consists of the following parts:

    • Handrail
    • Rails x2
    • Stiles x2
    • Latch block
    • Hinge Block
    • Balusters x8
    In the diagram above you can see the overall dimensions of the gate. and the positions of the parts. That's enough to start making calculations.

    Handrail

    The only dimension that the handrail affects is the height of the gate body. I wasn't sure what I was going to make it out of when I started but I knew I wanted it to be a little thicker than other parts so I decided on making it 1" thick.

    Rails and Stiles

    The rails and stiles should be the same thickness (mine aren't but it all works out in the construction techniques). I did all my original calculations at 1" thick for both of these parts but they actually ended up at 3/4" after jointing and planing. The diagram above shows them at their actual thickness but explains why the outer gaps between the balusters and gate are slightly wider than the rest.

    Stiles

    The height of the stiles is the total gate height minus the thickness of the handrail. In my case it was 33"

    [Stile Height] = [Total Height] - [Handrail Thickness]

    34" - 1" = 33"

    Rails

    The length of the rail is a little more complicated. It overlaps with the hinge block to allow pins from the hinge block to form a pivot point. I knew from the beginning that I was going to need to round over the end of the rail to avoid pinching the corners against the wall when the gate was opened. To give myself some insurance against pinching I wanted a 1/4" gap between the wall and the rail. On the latch side I wanted a 1/4" gap between the latch block and the gate, again to prevent pinching.

    That gives me the following calculations:

    [Rail Length] = [Opening] - [Latch Block] - [Latch Gap] - [Hinge Gap]

    39" - 1" - 1/4" - 1/4" = 37-1/2"

    Latch Block

    I decided to make my latch block an inch wide. I thought it would look good in proportion to the gate parts and would be thick enough to give my latch mechanism something to grab a hold of. I didn't determine the final height until the gate was finished but I ended up thinking it looked best if it was the same height as the body of the gate at 33".

    Hinge Block

    The hinge block needs to be captured between the top and bottom rails and I added a little bit of a space to make sure there's no binding. The length of the hinge block is the height of the gate body minus the rails and the gap.

    [Hinge Height] = [Gate Body Height] - [Top Rail] - [Bottom Rail] - [Gap]

    33" - 1" - 1" - 1/4" = 30-3/4"

    That gets us the height of the hinge block, but how wide to make it? I'd decided to make my gate body 1-1/2" deep That means for the gate to swing fully open and with the hinge pin centered on the top rail I needed the pin to be 1" from the wall. That's half the width of the top rail [3/4"] plus the gap between the top rail and the wall [1/4"]. Since I wanted the pin in the hinge to be centered(ish) I needed another 3/4" to the width (the other half the width of the rail).

    I also needed to round over the side of the hinge "barrel" to avoid pinching when the gate opens.


    The diagram above is a cross section of the hinge barrel. The block before shaping is 1-3/4" x 1-1/2" x 30-3/4".

    Balusters

    Maybe these are the simplest parts. I wanted the gate to be lightweight and I figured that 1/2" thick balusters would be plenty strong. I decided to make them 1/2" square because of how I was going to fix them in the top and bottom rail. More on that in a little bit. I wanted to keep the balusters legal for a handrail which is that the gap between spindles cannot be greater than 4", for this I needed to calculate how many balusters to make. 

    To calculate this I need the size of the gate body not counting the extensions for the hinges. That's going to be the length of the rail, minus the overlap between the rail and the hinge, minus the gap between the hinge and the gate and the gate stiles.

    [Gate Body] = [Rail] - [Hinge Overlap] - [Hinge Gap] - [Left Style] - [Right Style]

    37-1/2" - 1-1/2" - 1/4" - 3/4 - 3/4 = 34-1/4"

    That math gives us 34-1/4" between stiles. Dividing that by 4 gives us about 8.6. This is the number of gaps in the gate. Since we cannot have a half gap we round the number up to 9. To get the final spacing of the balusters we divide the 34-1/4" by 9. This gives us a final gap size of 3.8.

    But wait! Why didn't you need to take the width of the balusters into account?

    To make double sure that my gaps were small enough I'm going to space the balusters 3-3/4" on center.

    Step 4: Parts List

    All the math is done. The rest is writing down a parts list and rough cutting the parts. My gate is going to be 1-1/2" thick. 


    PartDimensions (h x w x l)Count        Material
    Handrail                xxx    1  Walnut
    Rails3/4" x 1-1/2" x 37-1/2" (*)                2  Poplar
    Stiles3/4" x 1-1/2" x 33"    2  Poplar
    Latch Block1" x  1-1/2" x 33"     1  Poplar
    Hinge Block1-3/4" x 1-1/2" x 30-3/4"    1  Poplar
    Balusters1/2" x 1/2" x 33"8 (**)  Poplar

    Notes:
    (*) The rails need to be cut a little extra wide for machining
    (**) I made a couple of extra balusters so I could pick the best for assembly


    Conclusion

    With the design complete and the parts list written all that's left is construction, finishing and installation.