Those are both good questions but the quota is one question per blog post.
The plans for the dresser I'm working on came from a set of bedroom furniture plans in Wood magazine. The dresser was featured in issue 160 December/January 2004/2005.
 |
| Image property of Wood magazine. |
I liked the look of the nightstand but I also wanted to make some changes. The nightstand as designed had an open bottom and I wanted to keep my clutter out of sight. The nightstand plans are basically two frame and panel sides with a bottom, a drawer and a top. To fit the door, I used the same technique as the dresser which is to build a carcass out of plywood, then glue the frame and panel sides to the plywood box. I kept the same dimensions but completely redesigned the inner construction.
So about five or six years ago I started the dresser. As I explained on other posts a number of life factors got in the way and I was unable to devote time to working in my work shop. A recent project to build legs for a friend's gaming table inspired me to get back into the shop and finish the dresser.
Here's the state it was in three months ago.
This is basically where I picked it back up. The case plywood frame has been put together and edged with white oak, the drawer parts had been rough cut and thicknessed and the panels for the sides and door had been resawn and stained.
The next step was to put the panels into frames for the sides and the door.
In the picture of the door glue up you can see how I used F-clamps to help make sure the joints lined up. The swatches of blue is painter tape where I marked the center line of the center stile and the top and bottom rails.
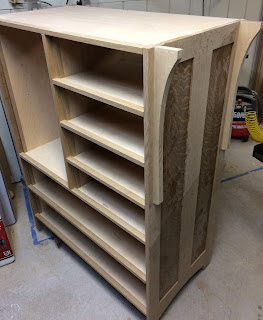
The side panels were glued up the same way. In the picture on the right I am gluing the corbels onto the sides. If I remember correctly I eyeballed the position when I glued the corbels onto the nightstand. I'm pretty good at judging the center of things by eye but I decided for the dresser to make a spacer to help make sure the corbels were straight and centered.
Then it was a simple matter of gluing the sides to the carcass. I say simple but I actually put a lot of effort into making sure this step went without a hitch. If I made any serious mistakes in gluing the pieces together I would have to scrap hundreds of dollars of material and dozens of hours of work. Fortunately everything went well.
The next step I took was to build the drawer boxes. They'll get false fronts added so they look pretty plain right now. I made these out of Poplar. I really like working with Poplar as it is inexpensive and cuts very easily. The one downside is that of all the woods I've used Poplar seems to be the most likely to warp and twist when I cut it. Fortunately the drawer parts sitting on top of the dresser for five years don't appear to be any the worse for it.
And this is where it is at today. My plan for this weekend is to cut the false fronts for the drawers while the dresser is still in my workshop because it will be easier for fitting them to the openings. I also need to cut and add the front and back skirt. If I have time I'll start on the top.
Then I'm going to move the dresser body to my finishing room to start putting Watco's Danish Oil on it. It only takes an hour or two to apply but then it takes at least a week to cure fully. I'll probably give it two before I start putting on the polyurethane.


