

So I know it looks like I haven't done any wood working over the 2018/2019 winter; however, I got a fair bit done. I've not posted anything because I decided that rather than posting every time I made any progress but to wait until I was finished and then post once per project.
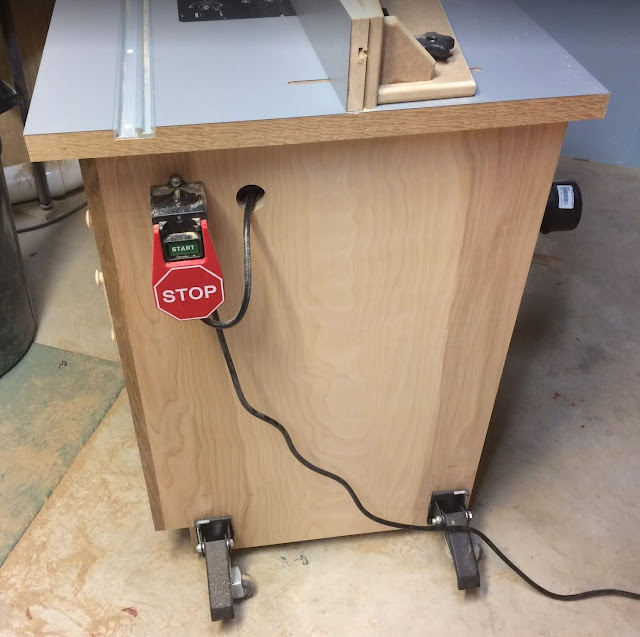
Last winter I decided my big project would be building the router table you see above. Construction went pretty quick but I got stalled when I reached the step using contact adhesive to attach the laminate. Contact adhesive is pretty nasty stuff. The dangers and warnings printed on the can convinced me to wait until the outside weather would permit me to do the gluing in the garage. Unfortunately a day didn't come until June where the temperate was over 65 degrees and I had time free. By then I was in full summer swing
Fortunately in July a friend of mine asked if I could do a small woodworking project with his fourteen year old daughter. This was fortunate because - lets call her E to protect her privacy - was a great study and was being very safe in the workshop so when she was doing tasks that didn't require direct supervision I could work on my router table.
But back to the router table...
I constructed it pretty much to Norm's Deluxe Router Station plans; however, I replaced the low-tech router plate with an Incra Mast-R-Lift-II-R that I ordered from Rockler Woodworking. I also added casters with quick release plates and a combination miter track and t-track by Rockler.
The Router Table
The plans are very good with lots of drawings. I didn't buy the episode video so I was basing my general assembly plans on what I remembered from seeing the episode once or twice years ago. I also kind of just made my own construction order.
The plans had all the measurements needed and I found no errors.
I wasn't able to find the exact same dust collection attachments that Norm used but I was able to make a similar item from Woodcraft fit the fence. I didn't like the 2-1/2" fittings for the back of the router so I designed a dust collection port and had a friend 3d print it.

It looks great and works awesome. At least until I bumped it with my knee and the 3d print broke right on the lamination. My friend has said he'll print me another one with 100% fill versus the 10%-15% fill of the one I have. Regardless it still works and if it fails before my friend reprints my dust port I'll make an adapter out of wood.
As previously mentioned I bought a router lift which ended up being a different size than Norm's plate. Since the Incra lift doesn't have the router centered on the plate I did a little math and figured out where the router bit would have been in his table and shifted the position of the lift to get my router bits in the same place.
Fortunately I had all the t-nuts and star knobs necessary for the fence already in my hardware collection. I didn't manage to find anywhere local that carried high-pressure laminate but Home Depot was willing to ship it to me at no cost so I mail ordered some from there.
All the grooves and slots in the router table top were made by attaching custom router template guides with double sided tape. I've not done a lot of this kind of template routing so I was a bit nervous but I took my time, double checked each step and it all worked out fine.
The Incra Mast-R-Lift-II
So why'd I choose the router lift I did? Well, I read a whole bunch of router lift reviews and they all spoke glowingly about all the lifts and then each picked a different "Best". What I took from this was that what differentiates the router lifts was small features unique to each but that they all worked well. Since I don't have any experience with router lifts I figured I could keep going back-and-forth about one feature over another or I could just make the best decision I could and pick one. The Incra works with the Porter Cable 7519 I already owned right out of the box so it 'won'.
The Incra Mast-R-Lift-II is a heavy piece of hardware. It's fit and finish looked great coming out of the box. The lift can be configured for a number of different router sizes without the need for any special collars. Installing the router is simple except for the need for setting the router close to but not actually touching the top. I used a couple of thin shims to get a consistent spacing.
Other than a slight hiccup in one corner I was able to get the router plate fitted without any drama. The drama came when I wanted to use the router table to put the t-track slots in the fence pieces and I found I could not lower the router to get enough of my 1" bit below the surface. What's the use of a router lift that cannot get a relatively short bit below the surface of the table. Then when trying to diagnose the problem I saw that the router lift was in the middle of its travel when the router was hitting the top plate. I just needed to raise the lift to the top before installing the router. Now aside from some chagrin that I must have missed a setup step everything is fine.


So far I've done a couple small projects on the router table and I love being able to change bits without needing to pop out the entire router and plate. It came in handy making the fence where I needed to route a groove with a 3/8" straight bit then without changing the fence route a t slot. I also love the precision the router lift gives me for tuning the height of the bit.
Summary
I love my new router table. It solves my biggest issue with my temporary table which was that it was taking up floor space. While my temporary table was designed to be able to be setup and taken down I never did. Since it was on saw horses it was very inconvenient to move when it was in my way. The fence was locked in place by a pair of clamps which wasn't terribly inconvenient but it did keep a pair of clamps tied up.
My new router table rolls around my shop withe greatest of ease. The only downside is that to click the wheels into the down position I need to lift the table. This is currently a pretty large downside. Since the top is only attached by gravity I cannot lift it by the top. The sides are pretty smooth and don't give any purchase for lifting. I need to add some kind of handholds so it will be easier to transition. So far I've found it easier to just keep it on the wheels.

My old fence just had an opening I'd cut into it. The new fence has adjustable sliders that allows me to control the size of the opening. I've found the star knobs to be about as convenient as the clamps. The one downside with the laminate top being slick is that I need to really crank down hard on the knobs to keep the fence from slipping under moderate pressure.

The drawers and trays provide plenty of space to keep all my spare router pieces and bits and gives me plenty of space to expand into.

The router lift was the most expensive part of the table but so far I am super happy with it. The ability to adjust the height in very small increments above the table saves time and increases precision. Being able to change bits without take the router and plate out of the table is also pretty awesome!
I've lost track of how much time I spent on the table but I'm guessing it was a few days of work putting the carcass together and then another couple of days building the table and fence.
All told I am very happy with how this project came out and while the components I chose to put into it made it expensive I feel they will be worth while in the long run. I would recommend Norm's plans to anyone wanting to build a full cabinet router table.

Also...
Since apparently everyone on the internet likes cat pictures, here is Heimdall doing some exploring of the router table in progress.