Sunday, June 18, 2023

Picture Frames

 Over the winter I made a couple of picture frames out of some soft maple I got a few years ago for free. I have a lot of the maple so I used a little bit of it to make the frames. I needed to wait until the weather got good enough to put finish on them.

Well, they got their finish, had the art put inside and have been hung on the walls.


The art is some water colors we bought from an artist on a trip to Saint Marten many years ago. Fortunately we stored them safely so they weren't damaged but unfortunately it took me over ten years to make the frames so we could appreciate them on our walls.

Hopefully the first couple of many more pictures to be framed and hung on my walls.

Radial Arm Saw Mobile Cart Progress


If you only count hours in the shop I've been making good progress on the Radial Arm Saw Cart. If you go by calendar it hasn't been that great. Regardless, last weekend I got the panels shaped.

My first step was to shape the tall outer panel as seen below.

Tall Panels

I cut the first rail slot by hand but then I got a little smarter and made a jig. I took one of the longer rail offcuts and cut it into three pieces. I then glued them back together to make a router template. To cut the rest of the slots in the panel I carefully measured, clamped the template in place, removed most of the waste with my jig saw, then trimmed to the exact size with a half inch pattern bit in my router.

I then used the first panel as a template for cutting the middle panel and the short outside panels. I used the same process. I lined up the first "template" panel on top of the other panels, removed most of the waste with my jig saw then used the half inch router pattern bit to get them exact.


Short Panels


Middle Panel and extra support rail

My first task this weekend was to drill the holes for the handles. I'd bought 1" black pipe for these and fortunately I thought to measure it. It's 1" inner diameter so the actual outer dimension was about 1-5/16". I don't have a Forstner bit that size so I just used a 1-3/8" bit. They'll be a bit loose but that's better than being too tight or not fitting at all.

Again, I carefully measured the position I wanted the holes to be on my template panel, used a center punch to mark the hole location and then drilled the hole on my drill press. It was a bit awkward because the positioning of the holes had most of the panel hanging off the table but I made it work.

After getting the holes drilled in the template panel I removed the bit from the drill press and used it and the template to mark the hole location in the middle panel. I then remounted the bit in the drill press and drilled the holes in the middle panel.

Now with all the joinery cut it was time to start gluing up the panels. I decided it would be easier to glue the center panel first. I'm not sure if I mentioned the source of these panels. In cleaning out my in-laws barn I came across a dozen prefabricated panels. They're thick veneer over a poplar core and they've been stained and have a film finish on them. To get a better chance of the glue holding everything together I'm sanding the finish off before gluing.

I sanded the back of the mid rail support and the top of the middle panel. I then spread glue by squeezing a bunch on and then spreading it with an old AAA membership card. It was when I went to apply clamps I realized my error. The little rail started sliding all over the place.

Fortunately I'd decided to buy a pin nailer over the winter and this gave me the perfect opportunity to pull it out and use it. So I quick got my compressor out and refilled, read the nailer instructions - at least enough to know what pressure to run it at and how to load nails, then pinned the board in place before adding a half dozen clamps.

I used the same process with the other two side panels but I skipped the frantic prepping the compressor and nailer step and just made sure it was ready.

Tall side panel glue up

I did use a lot of clamps gluing up the two side panels. I may have had the nailer ready but I didn't have any cauls ready. I did have the rails for the cart though so I used a couple of them to try to spread pressure across the panel. I noticed I didn't have any glue squeeze out on the bottom though so I took the other two rails and used them to put some pressure more in the middle of the panel. It isn't pretty but it worked.

My glue up of the short side panel went a little better as I was more prepared for the number of clamps I was going to need to use. I also used a lot less glue. The above picture of the long side panel looks like I am getting a reasonable amount of squeeze out but there was actually a lot in the middle opening. 

I was interrupted by dinner and other things while gluing but that worked out well because while that isn't all my clamps, that is most of my good clamps of this size. The interruptions came at just the right time for me to let the glue dry so I could get it while it was a little tacky.

I was kind of afraid at how the panels would come out alignment wise. I didn't cut the inner panels oversized at all so if anything slipped during glue up I would have misaligned panels. Fortunately tacking them together with my pin nailer did the trick. They all look fine so I guess I got lucky.

Left to Right: Short Panel, Middle Panel, Long Panel


Next step was to trim the panels cleaning out the rail cutouts, leg cutouts, and trimming the middle panel to length. This work was done with the jig saw, router and table saw.


My rails were unfortunately around 1/128 to tall so I ran then through the table saw shaving off a little at a time until they fit. I put a bevel on all the edges making sure to not bevel the rails where they were going to be inset into the vertical panels.

The the big glue up. I sanded the prefinished parts of the rails where they were going to be glued to the vertical panels and then carefully glued everything together.


As you can see from the above photo I needed a cross clamp to bring everything square but it was pretty close regardless. This was just making a very slight adjustment.

I glued up a couple of blocks to support the wheels, again sanding the finish where they were glued on. I intentionally left them a bit short of the rail so when I add drawers I'll have space to add the drawer rails.


And voila, done except for drawers I will add much later and a top.


And with the top...


I was intending to make the top out of a singe piece of wood/plywood but I happened to have two pieces of scrap panel that I could cut down and only "waste" a little bit of wood. I figured it would work as a temporary top and if it doesn't work I'll replace it later.

I had my neighbor - we'll call him Steve to protect his identity - come over and help me lift the saw onto the cart.


It still needs drawers and a table for the saw but at least it is up off the ground and is on a cart that will be easily mobile. I planned on putting adjustable feet on the leg side. I think I am going to wait a while before I put them on though. It seems to sit pretty stable so far.

I intended on putting of drawers for a while but then I came across a recycle bin full of accessories for the saw. I don't know when I am going to use them but it would probably be best to keep them with the saw. Maybe I'll add a quick shelf and see if I can fit the bin underneath.

We'll see...  For now, it is done.


Friday, April 7, 2023

More Sketchup - Four Drawer File Cabinet

 It is hard for me to get into the workshop during the week which is sad. However, doing design scratches the same itch as making sawdust for me. When I was learning to fly my instructors would call it chair flying. Basically, sit yourself in a chair and go through all the steps involved in starting, taxiing, and flying the plane. This is the same thing for me except I am building projects in my head. I am thinking about joinery, order of operations, etc.

I did design wheels for my tool cart.


They aren't perfect in every detail but they serve the purpose I needed. I'm tempted to go back in and make them more accurate as an exercise but I think I need to get a little better with Sketchup first.

With that done I remembered the other project I wanted to make. My in-laws had this beautiful quarter sawn white oak four drawer file cabinet. Unfortunately it has seen better days. The finish went bad and it suffered some water damage causing the veneer to buckle and separate. I briefly thought about trying to clean it up; however, I'm pretty sure building a new one will be less effort. So, I am going to design and build my own four drawer file cabinet.

A file cabinet is just another case of drawers. It shouldn't need anything too fancy. Sure it is going to get filled with hundreds of pounds of paper but does that really differentiate it from a bookshelf when just considering the case? I don't think it does.

I started my design with the drawer. Since the drawers need to be a specific dimension in order for the hanging file folders to work my drawer width is already fixed for me. I did decide that I wanted my cabinet to be 18" deep so that meant 16" drawers to leave room for the false fronts and cabinet back.

I'm going to hang my drawers on 16" full extension side-mount metal slides. These are easy to mount and should be plenty strong. I will not be opting for the soft close style.


Those slides look a little stubby because I could only find 24" and 14" slides in the Sketchup collection. 14" slides were sufficient to get the idea across and to help measure/fit the width of the cabinet. As you can see in the above photo I have a 16" deep drawer made from 1/2" material. The false front is 3/4" and is sized to leave a 1/8" gap all around. The 1' 1" width measurement is including the sides so there is 12" between rails.

The rails are 1/2" x 1/2" angle aluminum. I'm going to attach it to the top of the drawer sides using screws and epoxy.


With my drawers figured out I moved on to spacing them out. I put a 3" toe-kick on the bottom, added a 3/4" divider between each drawer, added a 1/8" gap, and topped it with a 2" thick top. Here's an image with one side and the back removed so you can see the internal structure.


You can see I left plenty of room for the 1/4" plywood back. I haven't included the rabbets for the back in the Sketchup yet and I don't know if I will. So long as I remember I need to do it when I am doing the construction it should be fine. Same reason I don't have joinery on the drawers yet. I haven't determined what material I will make them out of which may influence the type of joinery I will use.

The overall dimensions of the cabinet are 18" deep, 15 1/2" wide and 54 1/2" tall.

The stiles are going to be 2 3/4" wide. Both the top and bottom rail are going to be 5". In the above image the stiles are actually 3" wide but I thought they looked too big as they only leave 4 1/2" of panel. I'm going to shrink them to 2 3/4" which makes the panels 4 7/8" wide. This makes the panels twice as wide as the stiles vs only one and a half times as wide.

You can see from the above image that the sides are going to be proud of the drawer fronts and top. I initially planed on making it only 1/4" but on reflection decided that 3/8" might be better. I want to put a slight round-over on the sides and I still want to see a little bit of the flat sides in the reveal.  I think...

This is hard to see in Sketchup but I'll mock something up before construction and then decide. Fortunately I have plenty of space inside the cabinet to move the sides forwards or backwards as I want. I also want to mock up a drawer. I measure my metal file cabinets and it looks like I've got it right but I'll feel better knowing that the drawers will hold hanging folders before I go through the effort of construction.

I've already got my wood selected. I came into a supply of soft maple a few years ago and it's been just sitting in my basement. I think it is a beautiful wood and will make a superb filing cabinet.

I still need to finish my mobile tool cart for my radial arm saw and the bookshelf I started last winter but I am hopeful I will be able to get to this by this coming fall.

In the meantime I need to find something else I can model in Sketchup to stretch myself and learn it better.


Building the Rolling Tool Cart

In my last post I talked about learning Sketchup and making plans for a rolling tool cart to hold my radial arm saw. Here's the finished version.


It looks a little more squat than last week's version because last week I had the height wrong. I'd measured my table heights, measured the height of the saw including a new top on the saw, then promptly forgot to subtract the height of the saw from the total height. No worries, that just gave me an excuse to redo the Sketchup design from near to the beginning.

I wanted to get a couple of days in the shop this weekend but only got one. I had running around to do on Friday and I'd also slept poorly the night before. Power tools and poor sleep do not go well together and I don't do that. I did however get Saturday afternoon in the shop.

I got most of my parts sourced and rough cut and I got the rails glued up. I also marked out and cut out my outer tall side panel that I will use as a template for the rest of the panels.


It still needs some work but I got most of it done. I cut out the middle and the bottom using my cordless Makita circular saw. I used my homemade fence to layout and guide it and needed to plunge most of the cuts to get them started. It isn't the most comfortable way to start a cut; however, I am comfortable doing it when I have to. I stopped short of the corners and finished them will a Japanese style pull saw. Some of the corners didn't need more than a light sanding, some needed a file.

I'm trying to decide if I want to drill a pilot hole for the handles or the full hole. If I drill a pilot hole I can just drill the pilot hole  into the other panels. It feels like I might be able to drill the holes straighter by hand if I have a pilot hole versus using a Forstner bit to mark the center and then just winging it.

I actually started on my end panels first and then remembered that I needed the rails completed to make sure I cut the notches for the rails accurately. So after getting this far I went and grabbed another couple of my prefinished panels and cut the rails. Since the panels are prefinished I sanded the finish off the backs before gluing them together.


Why am I calling them panels rather than plywood? Well, it is because these aren't really plywood. They are a poplar core with two thick layers of veneer on top. These came out of my father-in-laws barn and I am sure they were scavenged from the garbage from somewhere he was working. Regardless, they were free to me and are super flat. I don't normally put finish on my shop projects but since these panels are prefinished I'm going to leave them as is. I'll just sand off the finish where I need to glue them.

Regardless, this was all my progress this week. I got my rails rough cut and glued together. I got my template panel cut out and cleaned up. (and yes, that was way too  much glue on those rails. It was a mess to clean up.)

I think I might print out a 3/4" radius template on my 3d printer this week and use that for routing the corners. I'd thought about designing my own but as people say, "if it's a clever idea someone else probably thought of it first." There are several designs for these on Thingiverse. This is the one I chose.

https://www.thingiverse.com/thing:2438336


I'm trying to decide what I want to model next in Sketchup. I'm thinking about doing the wheels for the cart. I'll have to figure out how to do toroids (donuts).


Saturday, March 25, 2023

I learned Sketchup

 I recently came into possession of an old Craftsman radial arm saw. I wasn't looking for one but when my father-in-law recently passed away I inherited his. He'd had it on a homemade stand made of 2x4's. It was serviceable but since it was easier to transport the saw without the stand I didn't take it. Also, since this will not be an everyday tool I cannot dedicate space in my primary workshop for it. This means I need a mobile base for a fairly heavy tool.

A friend of mine - we'll call him "Dave" to protect his identity - is a new woodworker and is still building his shop. When he was looking at buying a contractor table saw I did some research looking for home made mobile bases. He ended up buying one with a mobile stand and didn't need a homemade stand but I remembered this stand from my research.

https://www.woodsmithplans.com/plan/table-saw-stand/

It's a cute little cart and fits a lot of the criteria I was looking for:

  • Mobile
  • Smallish foorprint
  • No fussy build details
  • Stable
Their cart looks to be built out of southern yellow pine and plywood. My initial design was also using construction grade lumber and plywood; however, when picking up the saw I found a whole mess of veneered lumber. I changed my plan to use all sheet goods.

This is what I came up with:


Two sheets of plywood for each of the end panels. Each of the rails will be two strips of plywood. Then there will be a sheet of plywood on the top. 

What I wanted to mention here was, "I learned Sketchup". If you are reading this you've probably already heard of Sketchup. If you haven't, Sketchup is a 3d modeling tool with lots of features. If you are somewhat technically literate and maybe have some 3d design background it is quick and intuitive to learn. I made the above model after watching 40 minutes of videos and then another 5-10 hours of playing with the tool.

Pretty much every woodworker with a YouTube channel has made a video on how to get started so I am not going to try and replicate that here. The video I used was the Foureyes Furniture Part 1 & 2 by Chris Solomone.
Part 1: https://www.youtube.com/watch?v=AVb8ZBAOD0I
Part 2: https://www.youtube.com/watch?v=pqcEyXs0v4c

As of this writing the professional version costs $300/year. As a occasional hobbyist wood worker I could see spending $300 as a one-time cost; however, per year is a little much for me. Fortunately they provide a web-based version that is free for non-commercial use (i.e. hobbyists like me) and what I used for the above plan.

https://app.sketchup.com

One real strength is the ability to remove or hide parts, or spin to alternate perspectives.


More on this later but I wanted to share my excitement at learning the basics of Sketchup. I'll probably still keep using my pencil and paper for my initial drafting but I'm going to try to do final versions in Sketchup. I could see when I get a little more agile in the tool I might switch to using it exclusively.


Tuesday, October 19, 2021

What I did over my summer!

 Yup, I am still here. What happened? Summer and work. I'm one of the fortunate people who can work from home. In fact the company I work for has offered us the ability to work from home permanently. Or at least permanently until they change their minds. Yay!

Just because the blogging stopped doesn't mean the woodworking stopped. Woodworking slowed down but didn't stop.

Workbench

I finished my hand tool workbench last spring. I flattened the top of the bench using a scrub plane I made from an inexpensive Harbor Freight jack plane. It worked about as well as you'd expect. The plane is garbage. It isn't possible to adjust the frog to give the plane blade a flat surface to ride on. The blade and the chip breaker are stamped steel. To get the tension on the chip breaker it has a big hump near the bottom that interferes with the letting the lever cap sit on top. With the heavy scrubbing the parts would work loose and I needed to put them back together again. I got the job done but figure I should have bought a slightly less cheap plane from Home Depot or Lowes.


After getting the top planed flat I drilled some dog holes using my hand drill and a jig to keep everything straight.


Then I bought a big acme threaded bolt from Amazon and added a leg vise.


I added a dowel to keep the leg from swinging when I turn the screw. I also added an angled block on the bottom to keep the chop from racking when clamping something in it. 

The handle is still a temporary piece of dowel. I need to make better endcaps for it. I just got a 3d printer so perhaps I'll print new end caps. I also need to bolt the top to the legs a little more solidly. Right now the top slides off when I clamp a board.

Built in Closet Shelves

I made some built-in shelves for my gaming closet. I was hoping to better utilize the space and be able to store more things. That didn't happen but at least the games are easier to get to now.


French Cleat Laptop Shelf

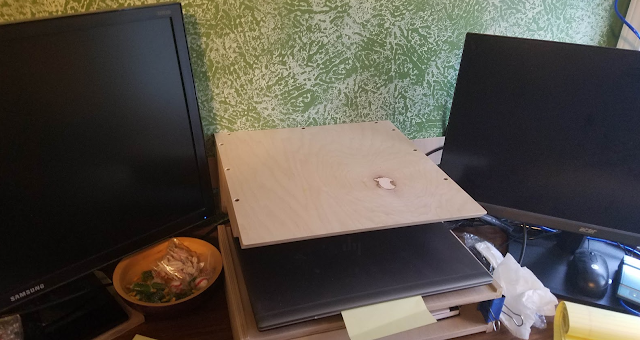
I wanted to be able to use my personal laptop on my office desk as well as my work laptop. So I built a French Cleat shelf that hovers my laptop over my work laptop.


Holiday Gaming Table

Last fall one of my neighbors had a garage sale. I didn't go; however, the next day while walking my dog I saw they had a small table out on the curb for garbage pick up. So I knocked on their door and asked if I could take it. They said sure, so I came back with my truck and picked it up.

The table was missing some hardware for connecting the legs. It was also kind of beat looking. Someone had painted a it white...  poorly...  then they got it dirty and the paint scratched and chipped.

I bought some paint stripper got it home, then re-read the safety instructions and then decided I didn't want to use a chemical stripper. I used several 60 grit sandpaper disks on my random orbit sander to strip all the paint. It took a couple of hours but I got all the paint off. Once I was down to raw wood the table was super unimpressive looking. Better than a dirty bad paint job but still pretty ugly.


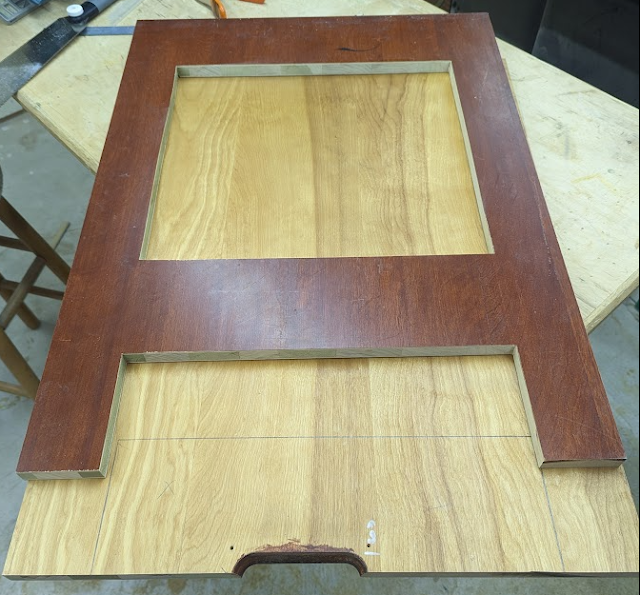
This table was destined for a friend who holds a party every 4th of July. We'll refer to him as Andy to protect his identity. I took cleaning up the table as a spring project. I thought this a perfect opportunity to try some things I don't really do that often. I decided to stain the top a dark brown and my idea for the legs was a dark green. Came out okay I think. 


It looks even better in someone else's game room basement.

Office Desk

Mid summer my wife and I were given the opportunity to choose whether we wanted to continue working 100% remote, 100% in office or a hybrid schedule. We both chose to work 100% remote.

I've been working on an old office desk and have been gradually tweaking it to make it more suitable for working at. My wife has been working on her old student desk. It was small, maybe 2ft x 4ft. Barely big enough to hold her laptop and a single monitor. She asked for something custom.

Since I know my woodworking isn't fast I decided to get her something much better quickly. The quickest way to getting her a 3ft x 6ft desktop was to buy a solid beech workbench top. It's massive. It weighs 100 lbs. 

I bought it from Grangier's on an internet sale. The first one I picked up had a really bad cup and I had to return it. While it was a pain picking up, returning, and then picking up a replacement they handled it very well. I'd shop there again. The second benchtop was as flat as I could test for.

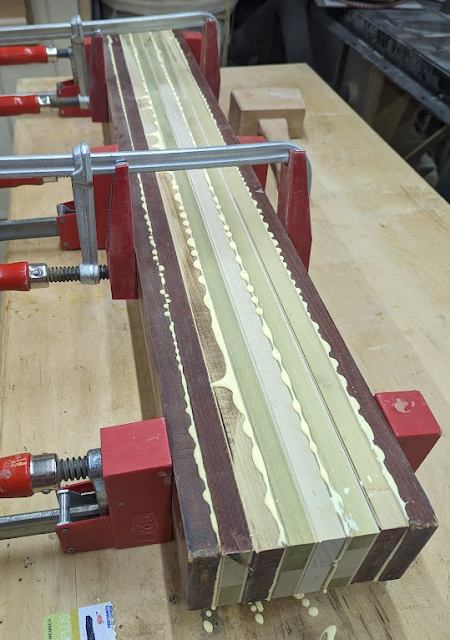
Coming off fixing up the little table for my friend I decided to make the legs the same way. 


It's basically some hanger bolts that pull the leg up against the skirts. I have to admit when I started this I was thinking of it as a cheap mass manufacturing way to build a table. After I worked with the joint a bit I gained a new respect for it. It's very strong, it breaks down easily, and it is very forgiving. If your measurements are off even a fair bit everything will still go together fairly well.

Anyway, we polyurethaned the top and painted the legs. My wife wanted a keyboard tray so I added one of those too. 


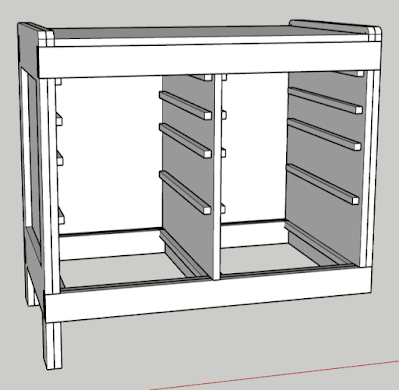
She wanted a couple of monitor stands that were Calculus, jQuery, and C# Design Patterns high. One of her friends quipped that that was the best use for a Calculus book she'd ever seen. So, not in place but I created a couple of wood boxes with smaller boxes inside as drawers.


Cat Wall

I built a cat wall. Okay, it's more of a cat playground and it isn't finished.


I attached a whole bunch of French cleats to the wall in our family room. The idea is to build a bunch of platforms and cubbies the cats can climb in and through. When they get bored I can rearrange the wall to make it new and interesting. The ramps are attached to the platforms with hinges so I they come apart and I can rearrange them in different shapes. 

This is all I have so far but I'll make some more this winter.

Free Wood

Well, I got free wood. I was at a summer picnic and struck up a conversation with a coworker. We'll call him Dan to protect his identity. Turns out Dan was an ex-woodworker, was moving, and had gotten rid of all his stuff excepting about 100 bd ft of soft maple. He offered it to me for free. So I got the trailer out, unfolded and drove over to his house and picked it up.

I've got ideas for using it this winter to build a bookshelf but I need to go through it to see if I am going to be able to get what I need out of it.


Chicago

I visited my parents in Chicago...


Heimdall is a pest

Mid summer Heimdall decided the puppy was her best buddy. The puppy was not happy about it but Heimdall doesn't seem to care.


Hobby Workbench

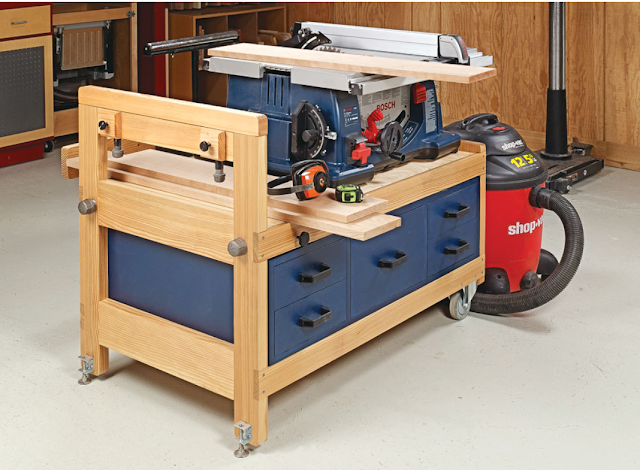
Wow, just realized that workbenches were the alpha and the omega of this post. Well, my wife and I decided to get 3d printers. We bought good quality but intro versions She got a resin printer to support her painting hobby. I got an FDM because I mostly want mine for making jigs and templates. I don't need a delicate high quality finish. To hold the printers we bought another smaller solid beech bench top and stuck some legs I built out of poplar and luan plywood. We painted the legs with leftover paint we had lying around.


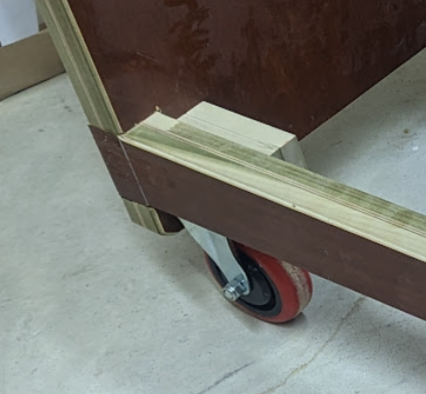
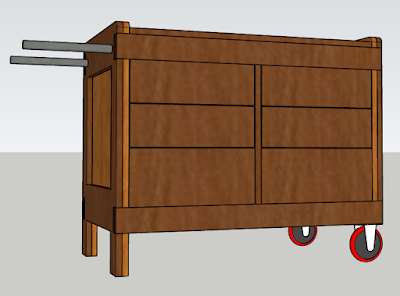
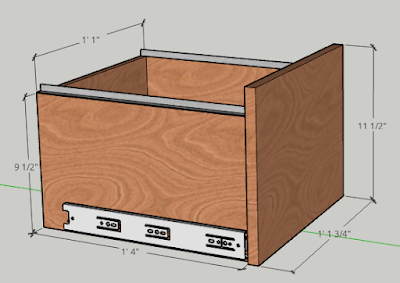
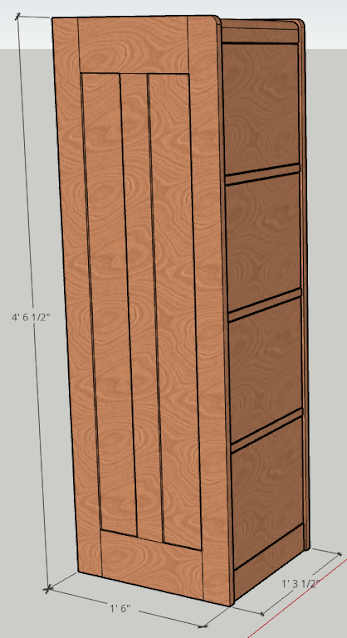
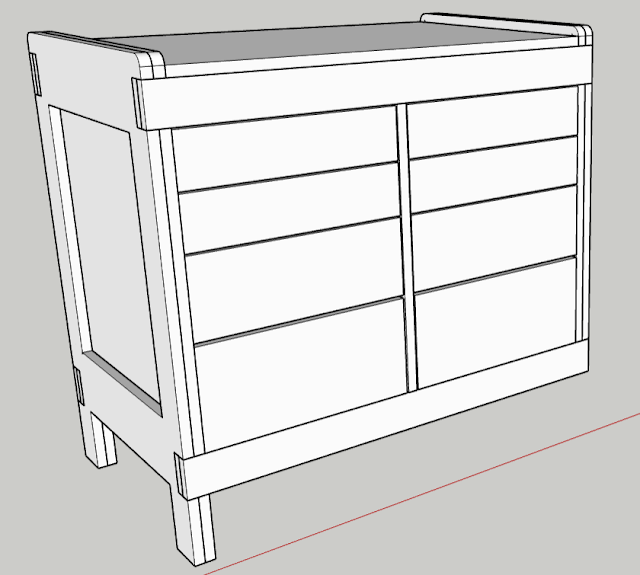
That's my Crealty Ender 3 V2 and her Proxon hot wire foam cutter. My printer has been moved to another room where it can run without disturbing anyone but the bench hasn't moved. I added foot levelers to the legs to make sure the top was level as well as flat. I'm currently working on light duty rolling cabinets to put underneath but they are still a work in progress.

Summary

It was a pretty busy summer. I didn't do any large projects but I did get a bunch of medium sized projects done. I'm hoping to build a nice bookshelf for my office this winter as well as do some more smaller projects to make our offices "better".

Tuesday, May 25, 2021

Yup, still here...

 It's spring / almost summer here in Upstate New York. I've got yard work, my day job has been busy... It's not my fault!  :)

Anyway, the workbench is done. I need to finish up the series I have on that. I'm currently working on refinishing a table I got off the curb last summer. It was a cheap piece of furniture that then got painted...  poorly... I stripped the paint and the original finish using my random orbit sander. Took me about three hours to do a poor job of it. Mostly I just didn't do a good job of cleaning up the swirl marks from the 60 grit I used for stripping everything.

Anyway, I'll hopefully get some pictures of that here sometime soon. I don't think I have any pictures showing how bad the original finish was but that's okay. It looks decent now.

What I do have for today is an update to my workshop floor plan. Here's the old one I used to plan everything years ago.


And here's the new one:


My friend Jon was asking how big my shop was and I knew I had a diagram on my blog so I looked it up. I was disappointed to see how old it was. I already had a Visio diagram of my basement, it was even mostly up to date. I just had to fix some of the measurements that were "off" and add the new tools since I'd last updated the floor plan (router table and hand tool workbench).

Yes, I would love to have a couple thousand square feet for my shop. I'm also grateful that I have what I have. Left side of the stairs is what I call my primary shop, the right side of the stairs is what I called either my secondary shop or the annex.

I don't do any woodworking in the annex. That is all wood and mobile tool storage. When I want to use one of the tools that is stored in the annex I roll it over into the primary workshop. Woodworking has become so much more enjoyable since I got all my space back.