I didn't get into the shop this week. Here in New York State our governor Andrew Cuomo issued an Executive Order requiring anyone in a public place where they cannot maintain a 6 ft distance from others to wear a face covering that covers your nose and mouth. I am skeptical as to the usefulness of a cloth covering for personal protection; however, I can believe that something that will cover my coughs or sneezes would help protect other people in case I am an asymptomatic carrier. So instead of time in my shop I spent time in my sewing room.
I'd been doing research over the last few weeks looking for sewing patterns. Three weeks ago I fund one I liked that was a surgical face mask pattern - i.e. it had pleats - however I couldn't find it again. I did however find this pattern at Craft Passion that looked like it would work and perhaps even be easier to make.
I decided to teach myself how to sew this week and making face masks seemed like a reasonable place to start.
My wife helped me dig up some leftover fabric and showed me her sewing kit then left me to set up the sewing machine. Not having instructions I ran thread everywhere it looked like it should go. Oddly enough it didn't work. I ended up with about a mile of thread jamming up the bobbin - the thingy under the needle holding the bottom thread. Seeing me take a screwdriver to her 50 year old Kenmore sewing machine my wife took pity on me and showed me how to properly run the thread.
Then I was off the the races. I'd watched a number of videos to see how to sew these masks and the one by Amanda Todaro was the most helpful to me. I cut out the paper pattern, used it to trace out the requisite pieces of cloth. I ran then through the machine and voila! I had a prototype mask. I don't have elastic but I do have yards and yards of paracord so I thought I'd use that for ties. I used a dowel to feed two lengths of paracord through the loops in the ends left for that purpose.
It worked bu 1/4" paracord really wasn't very comfortable to wear. The other thing I didn't like was the fabric was pretty but I felt it was too thin.
This weekend my wife asked me to make masks for my in laws. I switched in some thicker cloth for the inner liner. It isn't as pretty as the outer fabric but it is a bit heavier so it will hopefully do a better job of filtering droplets.
The cords are the same material as the inner liner just folded over four times (three times?) with a stitch run down the approximate middle. Much more comfortable than the paracord.
I want to try incorporating a nose wire in my next set. These did okay but I was noticing that when I exhaled I had a breeze going into my eyes that I couldn't get rid of by adjusting the mask. Except when I pinched it to my nose the breeze went away. I have some 16-3 romex that I can strip down for some 6" lengths of wire.
I'm very happy with my face coverings... Are they good? Most certainly not on the scale of anyone who does any quantity of sewing. Are they done and functional? Yes. Did they survive their first run through the washing machine? Yes.
One of the cool things about sewing is the similarities to wood working. No, there aren't mortise and tenon joints in sewing. You don't have to worry about wood stretching as your are gluing it together. However, The need for precision cutting and fastening is there. Knowing how to make a good joint between two pieces is important too. The need for hand eye coordination is much the same even if the actual motions are different.
If you're reading this and want a mask, let me know. I'll make you one.
Sunday, April 19, 2020
Sunday, April 12, 2020
Covid 19 week 4 - Finished Paper Towel Dispenser
The paper towel dispenser is done. It still needs finish but with my wife and I working from home we're using the finishing room as an office (technically, it's always been our office, I just do my finishing in there because we don't allow the cats in there. Because my finishing room isn't available I'm going to do the finishing in the garage. However, temperatures here this last week and predicted for the next ten days are dropping into the 30's overnight and are only reaching the 50's (Fahrenheit) during the day. And rain... oh, the rain.
Last week I'd built my box joint jig and made a couple of 1/4" thick quarter sawn white oak panels. This week I wanted to finish building the box.
I started by making a test joint in some 1/4" plywood. My previous experience with setting up box joints is they are very fiddly and require a lot of set up. In this case, to my surprise my first joint just worked. I thought about cutting more test joints but since the first one worked and the entire box is just a learning experiment I figured I should just dive in.
I started on the front right corner of the dispenser. Unfortunately I made two errors. The first error was not making sure I had enough room to cut the entire joint. I got most of the way through the first joint when my router table fence which I'd swung to the side got in the way of the front panel. Simple enough I thought. I'll just move the fence. And here is where I made my second mistake.
Since the panel was doing a pretty good job of staying in place I let go of it. The panel then promptly fell into the still running router bit. I didn't try to grab it. I learned that lesson years ago. However, the router bit did a great job of boring a hole into the panel. Needless to say I was disappointed. Fortunately the hole was near the end of the panel so I decided to just make the dispenser a little shorter.
After I finished the first half that corner I moved onto the side panel for the same corner. There was much less drama with the side panel. Test fitting the joint it came together a little snug but otherwise perfect.
At this point I was getting a little bored. I decided to pair up the sides and cut two halves at the same time. There's some risk from the extra complexity of managing two boards at the same time but on the other hand it cuts the time in half as you have half the number of cuts. This seemed to go okay but made me nervous since it was more challenging to keep the boards aligned properly. I cut the rest of the boards one at a time. Maybe I'll move onto the more advanced techniques once I get a little more practice.
Anyway, I worked my way around the box doing the rest of the joints. Unfortunately after the first corner my joints kept getting worse. I played around with how I was putting pressure on the jig and the boards in the jig. Frankly I'm not sure if it was that or that I was using oak which would occasionally splinter leaving me an odd sized finger in the joint. Since the spacing of all the joints down the line depend on the size of the previous finger one poorly cut finger messes everything up.
I think I'll come back and try again with a more forgiving wood like poplar or cherry.
Anyway, I used a chisel to trim fingers to get everything to fit. It doesn't look good but it worked. I could use wood filler of some sort if I cared but this is a workshop project. Also, I like keeping my early bad attempts around because when I end up mastering something I can see how far I've come. I'm not embarrassed by not being good at everything on the first try. It's part of living, learning, and growing.
I had an idea of how I wanted the opening in the bottom of the box to work so I traced it out on a piece of 1/4" plywood and cut it out with a jigsaw. I liked the look and it seemed to work for dispensing the towels so I used the better looking half to trace out the shape on a couple pieces of scrap (one being the off cut from my mistake on the front panel). After gluing up the box I just glued these directly to the bottom with no joinery.
I'd intentionally cut the fingers a little long so they were proud of the sides. I used my stationary belt sander to bring them flush, then used my random orbit sander to remove the scratch marks left by the belt sander.
Looking at my glued up box with one short side I decided that instead of cutting the other sides down to the same height as the front I could instead cut the sides at an angle and have a slopped top. My thought was that maybe it would also help keep it from accumulating dust in the shop. I used a straight edge to mark the cut then eyeballed the angle on my table saw. It took two passed (front and back) to cut all the way through but it came out fine.
I looked for a single piece of scrap wood that I could make the top out of but all my scraps were either too thin or were too small in one of the other dimensions. Instead I took some of my 1/4" scrap and laminated them together with the top piece being larger than the box and the inner being a tight press fit. The lid has no mechanical fasteners, it gets held in place with gravity.
Along the process of construction I'd briefly thought about using a french cleat to hold it to the wall but I wanted this to be a quick build. I haven't mounted it to a wall yet; however, I am most likely just going to drive a couple screws through the back. Now that the back is taller than the front I wont even have to angle the screw holes.
It's too cold here in upstate New York to do finishing outdoors and since my family is sheltering in the home I'm deferring all my finishing for a few weeks. I've got a backlog of quarter sawn white oak projects. They're all probably going to get Watco Dark Walnut Danish Oil and a few coats of wipe on polyurethane. I'll post pictures when they are all done.
Saturday, April 4, 2020
Covid 19 Week 3.1 - Box Joint Jig
I worked on two projects today. The first thing I did today was decide how I wanted to "lock" the weapons onto the mounts. I came up with a simple restraining arm that will screw into the end of one of the pegs and will be able to be swung across the front to keep the weapon from falling off the pegs. I cut the restraining arms, sanded and fit them today. I didn't get pictures so I'll make sure to get those into the final pictures when the project is done. Now I just need to wait for a few days where the weather will permit me to apply some danish oil and polyurethane.
My big project for today was building a new box joint jig that I'll use for building my paper towel dispenser. I mentioned in a previous post that during the early days of the covid crisis people were buying every paper product and hoarding it. I happened to be out of or low on pretty much every paper product you can think of so when I found some tri-fold towels at BJsI bought some. Now that the stores are restocked we can get most things so I'm going to use the tri-fold towels in my shop. They'll probably actually be better than "normal" paper towel rolls as far as convenience goes.
The box joint jig starts with a base that keys into the miter slot and is locked into place with a couple of clamps. I'm using some cheap C-clamps that I probably bought from Big Lots. I just thought I'd use them because they were low profile and I haven't really ever used them much yet. I used my router table to cut two slots the length of the base that will accept runners from the movable part of the jig.
The larger of the two holes is for the router bit. The smaller of the two holes is for access to the router lift mechanism so I can adjust the height of the cut without removing the jig. I drew the line across the jig to show when the sliding part has cross the middle of the bit so I know when I've completed my cut.
The sliding part of the jig is made up of a 1/4" plywood base that slides on two runners captured in the slots in the jig base. The fence is two pieces of 1/2" plywood. The front fence is held to the back fence with a couple of t-bolts and t-slots. The sliding fence will allow me to make micro-adjustments to fine tune the fit of the joints.
I finished up my workshop hours to glue the key in place so I didn't actually try it out yet. I'll try to get some better pictures of the jig in use when I cut the joints on the towel dispenser.
Speaking of the towel dispenser, I'd resawn and glued up some quarter-sawn white oak panels earlier this week. While I was waiting for the glue to dry on the jig I worked on cleaning up the panels. I briefly thought about sending them through the planer to get them level; however, I'd done a pretty good job getting the boards lined up when I clamped them. I was able to scrape the glue then use my random orbit sander with 60 grit paper to get them flat quickly, then 80, 120, 180, and finally 220 grit to smooth them out.
That was today's progress. Hopefully I'll be able to get into the basement tomorrow and make more progress.
Friday, April 3, 2020
Covid 19 - week #3 of Extreme Social Distancing and Too many projects
So, it isn't actually week #3 of Covid 19 but it's my third week of physical distancing. As I think I said last week I am one of the fortunate few who can work from home so my days aren't much different from pre-Covid days. I get up, work for 8 or 9 hours, walk the dog for an hour or so, make dinner then if I have any energy left go do some woodworking.
The super secret project? Well, I probably mentioned it already in another post. I'm building my Gaming Console Console. That will probably be a few posts by itself so I'll just mention that I glued up the side panels to the case a couple of weeks ago and otherwise they've just been sitting while I've been distracted by other things.
Stay safe out there. Physical distancing isn't necessarily about keeping you safe. Since covid can be asymptomatic and still be contagious everyone should treat themselves as infected and take steps to protect other people from themselves.
Also, note that I switched from Social Distancing to Physical Distancing. The point is that we all should not just hide from other people in our bunkers. We should be hiding in our bunkers but we shouldn't be hiding from other people. Keep your physical distance but keep your social circles close. Reach out via phone, text, email, google hangout, or whatever it takes to stay in touch with your friends and family.
If you know me and want to talk, just give me a call. If you don't know me but have my phone number please don't call. That'd just be creepy.
This brings me to "too many woodworking projects. I've actually got at least three projects in progress right now. I've got my super secret winter project that is a bit late - more on that later, I'm making half a dozen plaques to hang medieval weapons on a wall - more on that later. I'm also building a paper towel dispenser. More on that right now.
Like many places in this country during that first week of Covid scare there were no paper products to be found anywhere. There's still very little toilet paper. I don't really understand people. Anyway, we were out of paper towels and the only thing left at the warehouse store we were shopping at were trifold towels, so we bought a box of them. Since then we've gotten a couple rolls of paper towels so I want to build a tri-fold paper towel dispenser for my workshop.
I decided to make it out of quarter sawn white oak because I have a lot of it left over from building my dresser. Feels strange using a relatively expensive wood for knock-together projects; however, I disliked working with it enough trying to make something all match I don't think I'm going to be building another piece of furniture out of it any time soon. Anyhoo... It's basically going to be a box jointed box with a slot on the bottom. I'll probably put a hinged lid on top to keep sawdust out of it.
I've built at least one or two box joint jigs for my table saw but I decided that since I have a nice new router table I'd build a box joint jig for that instead. I don't have any pictures of any of this project yet because all I have is a brick of paper towels, a couple of oak panels glued up, and some parts to my future router table jig.
I'll hopefully have time to work on it this weekend and get some pictures.
I'm sure the suspense has been killing you... what is with all these medieval weapons? Well, back when my spouse and I were in our 20's we both thought they were kinda cool. So I bought a few as gifts over the years. Not having a good way to display them they just piled up in a closet. Last weekend I decided it was time to resolve this by building some wall mounts for them.
This is a project I more want more done than done well. Mostly I want the closet space back.
So I looked around for what wood I had that would make a decent wall mount and settled on some quartersawn white oak left over from building my dresser. Yes, the same white oak that I am using for my paper towel dispenser. Anyway, I printed out a shield pattern I found on the internet and used it to cut out a quarter inch thick template. I used the template to trace out a handful of white oak blanks and a single 3/4" plywood blank. I cut them pretty close to the line on my band saw because I wanted to minimize cleanup time and then used my stationary belt sander to sand them down to the line.
I used my random orbit sander to sand all the surfaces from 80 grit up to 220 grit. It didn't feel like it should have taken too long but I believe it was actually a matter of hours.
I mounted a 1/4" shank 1/2" round over bit in my router table then used the 3/4" plywood blank to test my setup. Then when I was happy I routed the round over a little bit at a time on each of the oak shields. I kept raising the bit until I'd cut a little bit of a shoulder.
Then I considered how I wanted to mount them to the wall. Yeah, maybe it would have been better to think of that first but hey... It all worked out in the end. I decided I'd mount them to the wall with a single anchor in the wall and a keyhole slot in the back of the shield. Making a jig to guide the router would have been easier if I'd made it before cutting the shields out. I thought I'd make a jig that I could clamp the shield in place that would guide my router. Then I realized I was putting the slot on the back. I could just cut out another "shield" out of 1/2" MDF and cut a slot to guide the router with a collar.
Since the template matched the shape of the oak shields I just lined it up, screwed it down then routed my slots. I used a 1/4" spiral straight bit to hog out most of the waste, then replaced the straight bit with a keyhole bit and finished the cuts. With the mounting slots cut in the back I measured the width of the handles on my weapons and drilled holed for 1/2" dowel supports.
This is pretty much the current state of the wall mounts. I've got to figure out how to secure the weapons on the dowels so that if they get bumped they don't fall and hurt someone or something. I'm not exactly sure how I'm going to do it but I have a couple of ideas. I'm thinking I'm just going to drill some holes and secure the weapons with a piece of paracord knotted in the back.
Then there's just finish and installation.
The super secret project? Well, I probably mentioned it already in another post. I'm building my Gaming Console Console. That will probably be a few posts by itself so I'll just mention that I glued up the side panels to the case a couple of weeks ago and otherwise they've just been sitting while I've been distracted by other things.
Stay safe out there. Physical distancing isn't necessarily about keeping you safe. Since covid can be asymptomatic and still be contagious everyone should treat themselves as infected and take steps to protect other people from themselves.
Also, note that I switched from Social Distancing to Physical Distancing. The point is that we all should not just hide from other people in our bunkers. We should be hiding in our bunkers but we shouldn't be hiding from other people. Keep your physical distance but keep your social circles close. Reach out via phone, text, email, google hangout, or whatever it takes to stay in touch with your friends and family.
If you know me and want to talk, just give me a call. If you don't know me but have my phone number please don't call. That'd just be creepy.
Thursday, March 26, 2020
Covid 19 - Week #2 of extreme social distancing
Many other makers are doing what they can to continue their media presence during these trying times. Adam Savage is building a giant Ghostbusters Ecto-1 scale model kit using his phone to live stream. Jimmy Diresta has released a couple of videos on YouTube and did a voice over which he doesn't normally do. I figured I could give all my loyal fans a quick update on what is happening here at Felix Enterprises.
To everyone who reached out to me asking how I and my family are doing. We're all fine so far. We've been working from home for the last two weeks and are extremely grateful that we have jobs that allow us to do so. To everyone who has been laid off or furloughed, you have my sympathies. To everyone who has a essential job and cannot hide in their home like I am, you have my thanks and I hope you all stay safe.
Since I am able to work I haven't had copious amounts of free time. It seems like the time I should have gotten back from not needing to spend an hour a day on the road has been taken up with other daily living activities. Might just be that I am spending that time walking my dog and enjoying the spring weather such as it is here in upstate NY.
Anyway, I was sitting at my desk in my home office staring at the wall in front of me. I don't use my home office for much other than the occasional work from home day or when I want to have an extra monitor for whatever I am doing on my laptop. Most of the time I just sit on my couch in my family room with my laptop in my lap.
Where I am going with this is my office isn't used enough to even be all that messy. It just is. Now that I'm working from home I'm sitting at the desk for 8 to 10 hours a day and I'm trying to make it better. I've got speakers so I can listen to the radio (NPR mostly), I've got my Lenovo S10-3t sitting next to me streaming NPR and displaying the John Hopkins Covid 19 map. If you haven't seen this map, it is awesome!
So since it looks like I'm going to be working from home for the indefinite future, I've been organizing my home office desk over the last few days. It's in pretty good shape now. I think I'm going to get rid of an old CRT I have sitting on top of a cabinet I made as one of my early woodworking projects and use it as a desk extension. I was also staring at the wall behind my laptop thinking it would be fabulous if I could post things on it.
Then I remembered a project I did with a bunch of my friends children over Labor Day. The kids are all in the twelve to eighteen age group so I made a bunch of kits for putting together a white board / cork board combination. I made a bunch of extras because I wasn't sure how many kids would want one and having extra bits when doing a project at someone else's house is always a good plan. So I ran downstairs into my workshop tonight before my weekly Sentinels of the Multiverse game and quick threw together one of my last kits.
Now I've got my own message board!
As a final note... stay safe out there. Here in North America we're still on the upswing for new cases being detected. Social distancing will save lives. It isn't just about keeping you safe it is about keeping everyone you interact with safe because you might be an asymptomatic carrier.
We'll make it through this. And for god's sake, don't buy more toilet paper than you need. Leave some for the rest of us.
Saturday, February 8, 2020
My 2019 Holiday Vacation
I had some time off around our winter holidays this year so I put my time to good use around the house.
or so I thought...
A friend of mine - we'll call him Scott to protect his real identity - also wanted to build some shelves of the same design for his basement. He stopped by my house, we hooked up my harbor freight super duty folding trailer and took a trip to the local DIY store to pick up lumber for both our projects. For this project I needed six 2"x3"x96" pine, two sheets of 1/2" fir plywood and twelve 1"x3"x96" pine. I also picked up some luan pplywoo and cabinet paint grade maple plywood and some 4x4's for other projects.
Unfortunately rather than building our shelves together Scott had to take off early to deal with an issue at home. So, I cut down my 1/2" plywood sheets into four 2'x4' pieces each and used the 1"x3" pine to create an apron around each shelf deck. I cut out a 3/4" x 2-1/2" notch in each corner to make a pocket to fit the 1"x3" pine "legs". I didn't glue anything together and just used deck screws to hold everything together. This all went pretty quick... I'm thinking it must have taken me four or so hours to build all my shelves.
It was when I went to install them that I had my first issue. I'd thought I had enough vertical space for the legs; however, when I went to raise the first one I found that there was stuff in my way. The previous owner had put a shelf into the rafter space in the back of the garage. I've left it pretty much alone since I moved into this house 20 years ago but now it was time for it to go. I first had to pull down a lot of filthy plywood. None of it was any good and I ended up using my cordless Makita circular saw to cut it down and put it out on the curb for the garbage pick up. I was only part way through the job when I realized how dirty it all was, how the insulation was moldy, and there might be mouse droppings. So I stopped, took a shower and changed into fresh clothes and protective gear. Basically a tyvek suit, my dual canister respirator and disposable shoes. It was hot work even though it was only in the 40's F but at least I wasn't getting moldy fiberglass insulation in my hair and lungs.
The cleanup took the rest of my first day including cleaning the mess I made pulling down the plywood and old insulation. The next morning I started putting the shelves together. It's a job that would be much easier with a little bit of help; however, I am used to needing to do large projects by myself. The main trick is figuring out how to hold parts in position without needing to use your hands.
In my case I set my base shelf on the garage floor. I used 2-1/2" screws to attach two of the legs to the base shelf. Then using my 4 ft level I carefully plumbed two of the legs and used a couple of braces to keep them in position. I then did the same for the other two legs. I used more scraps as spacers to make sure all the legs were space appropriately. To add the remaining shelves I measured the location of the bottom of the shelf and screwed a brace to each of the two outside legs. This allowed me to set the next shelf in the correct location and not need to use my hands to keep it in place. I used a pair of 1-5/8" deck screws to tie the shelf to each 2"x3" leg.
After getting the second shelf in place the rest was relatively easy. I removed the angle braces that I'd use to hod the legs in place and added two more shelves to the first "tower". I then added another base shelf next to the first tower, added another pair of legs using braces to keep things square(ish) then using the same techniques added the rest of the shelves. When it was all done I slid it back against the wall, hauled my tire rack back in from the car bay in the garage and then put all the junk I wanted to keep back on the shelves.
It isn't organized yet but I can wait until nicer weather in the spring to do that. Other than having to clean out some legacy lumber and moldy insulation my installation went pretty easy and I'm very happy with the results.
Scott did eventually show back up and with my help built all his shelves. He took them home and set them up in his basement. He and his wife - we'll call her Katie to protect her identity - are very happy with them. He's got 16' of shelving with three shelves per tower.
Garage Shelving Units
My first project was building some shelving for my garage. When we bought this house there was a potting bench in the back of my garage. We don't really do any gardening so the bench really just became a horizontal surface to acquire piles of junk on and under. A few weekends ago knowing this was going to be a December project I tore out the bench and got rid of the junk that wasn't worth keeping. With the space all clear I was ready to install the shelves.or so I thought...
A friend of mine - we'll call him Scott to protect his real identity - also wanted to build some shelves of the same design for his basement. He stopped by my house, we hooked up my harbor freight super duty folding trailer and took a trip to the local DIY store to pick up lumber for both our projects. For this project I needed six 2"x3"x96" pine, two sheets of 1/2" fir plywood and twelve 1"x3"x96" pine. I also picked up some luan pplywoo and cabinet paint grade maple plywood and some 4x4's for other projects.
Unfortunately rather than building our shelves together Scott had to take off early to deal with an issue at home. So, I cut down my 1/2" plywood sheets into four 2'x4' pieces each and used the 1"x3" pine to create an apron around each shelf deck. I cut out a 3/4" x 2-1/2" notch in each corner to make a pocket to fit the 1"x3" pine "legs". I didn't glue anything together and just used deck screws to hold everything together. This all went pretty quick... I'm thinking it must have taken me four or so hours to build all my shelves.
It was when I went to install them that I had my first issue. I'd thought I had enough vertical space for the legs; however, when I went to raise the first one I found that there was stuff in my way. The previous owner had put a shelf into the rafter space in the back of the garage. I've left it pretty much alone since I moved into this house 20 years ago but now it was time for it to go. I first had to pull down a lot of filthy plywood. None of it was any good and I ended up using my cordless Makita circular saw to cut it down and put it out on the curb for the garbage pick up. I was only part way through the job when I realized how dirty it all was, how the insulation was moldy, and there might be mouse droppings. So I stopped, took a shower and changed into fresh clothes and protective gear. Basically a tyvek suit, my dual canister respirator and disposable shoes. It was hot work even though it was only in the 40's F but at least I wasn't getting moldy fiberglass insulation in my hair and lungs.
The cleanup took the rest of my first day including cleaning the mess I made pulling down the plywood and old insulation. The next morning I started putting the shelves together. It's a job that would be much easier with a little bit of help; however, I am used to needing to do large projects by myself. The main trick is figuring out how to hold parts in position without needing to use your hands.
In my case I set my base shelf on the garage floor. I used 2-1/2" screws to attach two of the legs to the base shelf. Then using my 4 ft level I carefully plumbed two of the legs and used a couple of braces to keep them in position. I then did the same for the other two legs. I used more scraps as spacers to make sure all the legs were space appropriately. To add the remaining shelves I measured the location of the bottom of the shelf and screwed a brace to each of the two outside legs. This allowed me to set the next shelf in the correct location and not need to use my hands to keep it in place. I used a pair of 1-5/8" deck screws to tie the shelf to each 2"x3" leg.
After getting the second shelf in place the rest was relatively easy. I removed the angle braces that I'd use to hod the legs in place and added two more shelves to the first "tower". I then added another base shelf next to the first tower, added another pair of legs using braces to keep things square(ish) then using the same techniques added the rest of the shelves. When it was all done I slid it back against the wall, hauled my tire rack back in from the car bay in the garage and then put all the junk I wanted to keep back on the shelves.
It isn't organized yet but I can wait until nicer weather in the spring to do that. Other than having to clean out some legacy lumber and moldy insulation my installation went pretty easy and I'm very happy with the results.
Scott did eventually show back up and with my help built all his shelves. He took them home and set them up in his basement. He and his wife - we'll call her Katie to protect her identity - are very happy with them. He's got 16' of shelving with three shelves per tower.
Magazine Boxes
But wait! That's not all! I also assembled eight or nine of my magazine boxes. But that's a story for another blog post.
Trailer Inspection
Since I'd already gotten my trailer out and it was due for inspection I took it in and had the lights checked which is pretty much all that is done for a NYS light trailer inspection. I don't think I've talked about this elsewhere on this blog... When I built the trailer I wanted a way to check the lights without needing to hook it up to my truck. I built a test harness from some switches, an extra 4 pin trailer connector and a 12v adapter I bought from Amazon. This is probably a good topic for a short blog post. But basically I can plug in my trailer and then test each light individually.
Utility Cabinet
I do think I've mentioned elsewhere that my wife paints miniatures. She's actually really good. And by pretty good I mean she's a studio painter for a couple different miniature manufacturers. As a result she has a lot of supplies that she uses in her hobby and wanted a storage unit to keep most of the everyday supplies in. We didn't put a ton of thought into the design but she did decide she wanted to take a 6ft wall for her built-in storage unit. The first piece would be half that so she spec'd out drawers and trays for a 3ft wide unit.
The cabinet consists of two deep drawers on full extension slides on the bottom, three six inch trays, five four inch trays and an 18" shelf on the top. The pulls on the trays are some very inexpensive library-style pulls I bought off of Amazon. The pulls on the drawers are shop made.
Jen wanted to be able to have some way to indicate the tray contents. The long term plan is to add veneer to the front of the trays and using the veneer fashion a slot that holds 3x5 cards. Until then we've just used large binder clips to hold the cards in place.
The cabinet took me about a day to put together. I "cheated" in that only traditional joinery is holding the top and bottom in place. That's just a tongue and dado joint. After giving the glue a chance to dry I added the back which is just 1/4" luan. The back is glued and stapled in place with 1/2" 18 guage staples.
After giving the glue on the back a chance to dry I started adding the shelve. All the shelves are held in place with pocket hole screws. I used spacers to make sure they were all consistent heights. I did a fairly good job. I was off by about 1/16" on one side after installing the nine shelves.
After getting the cabinet in place it felt a little top heavy so I added a screw strip along the top back and used some long washer headed screws to fasten it to the wall.
It took me another day to build all the drawers and trays. Again I "cheated" a little bit. I'd originally planed to make the trays and drawers out of resawn poplar and then to use through dovetails. For expediency I ended up making them out of 1/2" baltic birch plywood and using a tongue and dado joint on the corners. The bottoms are just 1/4" luan face glued to the bottom. This should be plenty strong enough for the weights the trays will be holding and the simplicity of the construction allowed me to build them all in a day.
After the glue on the trays dried I used a rabbet bit on my router table to make a finger pull on the front that would give room for the binder clips. I also added the pair of library pulls to each tray.
Jen wanted to be able to have some way to indicate the tray contents. The long term plan is to add veneer to the front of the trays and using the veneer fashion a slot that holds 3x5 cards. Until then we've just used large binder clips to hold the cards in place.
The cabinet took me about a day to put together. I "cheated" in that only traditional joinery is holding the top and bottom in place. That's just a tongue and dado joint. After giving the glue a chance to dry I added the back which is just 1/4" luan. The back is glued and stapled in place with 1/2" 18 guage staples.
After giving the glue on the back a chance to dry I started adding the shelve. All the shelves are held in place with pocket hole screws. I used spacers to make sure they were all consistent heights. I did a fairly good job. I was off by about 1/16" on one side after installing the nine shelves.
After getting the cabinet in place it felt a little top heavy so I added a screw strip along the top back and used some long washer headed screws to fasten it to the wall.
After the glue on the trays dried I used a rabbet bit on my router table to make a finger pull on the front that would give room for the binder clips. I also added the pair of library pulls to each tray.
All in all
All in all it was a pretty successful week of getting things done around the house. I'm pretty happy.
Sunday, November 17, 2019
Hexagons, Part 3 - Milling the columns
Step 1: Rough milling
The first step to any woodworking project is to break the purchased boards down into slightly over sized parts. These parts are left to acclimate to shop humidity and temperature. Once they've had a chance for all the tensions to balance they get run through the jointer and planer process again to reflatten the boards.
To be honest I typically eschew this process and just straight to finished sizes and if a board warps too much I make a new one. I am going to make an exception for this project since the precision and more importantly the consistency is extremely important.
I'm going to put a border around my hexes so I'll also mill some 1/8" thick walnut strips. I'll need enough to cover all the faces so that's 114 linear feet of 1" wide strips. If I can get a thick enough walnut board I'll just rip them off 1/8" at a time.
Step 2: Set the final height of the hexagons
At this point I have a stack of 8/4 maple boards that are of various thicknesses. The first step is the pare them down to the finished thickness. You can be as exact in this step as you want. If you are a touch compulsive feel free to be super precise. If you are more of the wild-and-free sort feel free to be a little sloppy. The rest of the process will result in a perfect hexagon regardless.
Whatever the thickness you have coming out of the planer at the end of this step will be the final height of the hexagon column.
What is most important is that after this step the planer should not be adjusted again until all the hexagons are completely finished. The planer height is defining the height of the hexagon if it gets moved your hexagons will not go together evenly.
Step 3: Making the boards hexagonal
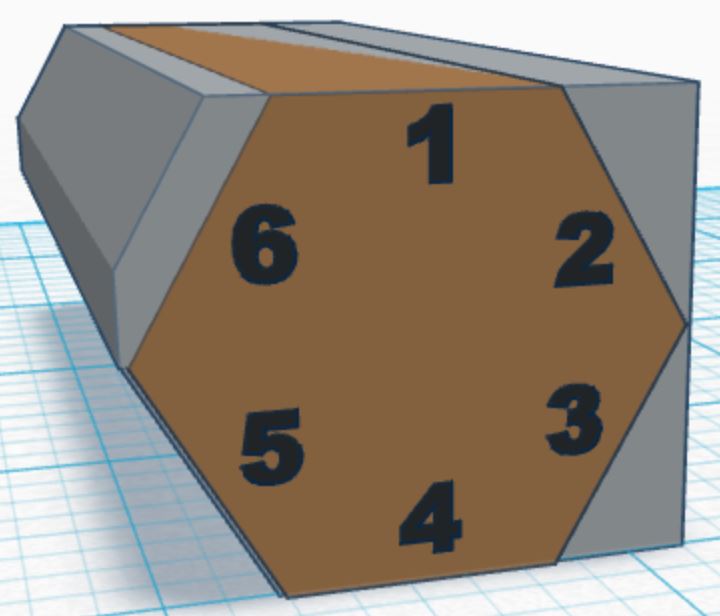
At this point I have my boards flattened and the final height set. The next step is to transform these boards into hexagons. I use three tools for this step: Planer, Table Saw and my Wixey Digital Angle Gauge.
What is most critical is that the height of all parallel faces of the hexagon are identical. It is is slightly less critical but still important that the angles on the sides are as close to 60 degrees as possible.
![]() |
| Figure 1: Reference hexagon |
Step 2a: Clipping the corners
I use my Wixey Digital Angle Gauge to set the angle on the table saw blade to 60 degrees. I suppose if you didn't have one of these you could use a drafting square. I do have one so I use it.
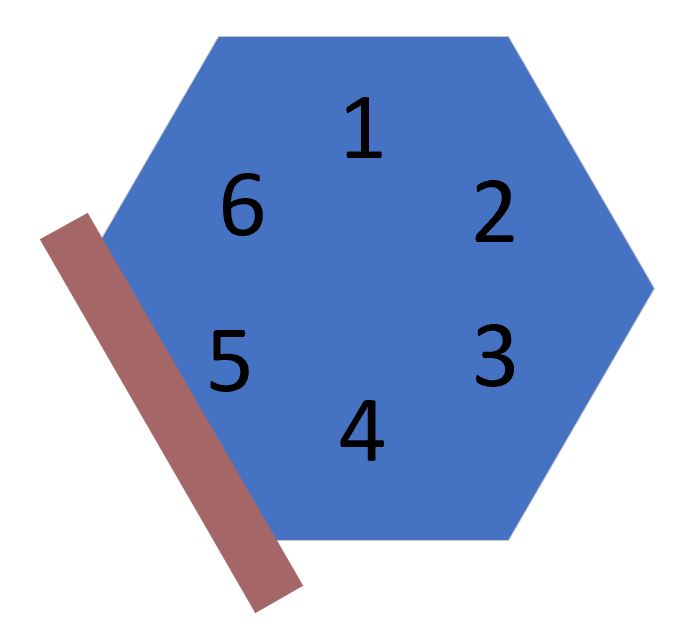
I set my fence to take a little bit off the corner of the blanks. I flip the work piece upside down and to the same to the other corner on the same side. I keep creeping the fence inward until the two sides - 5 & 6 - meet at a point.
Step 2b: Finish the hexagon
The next step is to set the table saw fence to complete the hexagon shape. I also make sure sides 1 and 4 are a little longer. I aim for between 1/32" and 1/16" extra to take off later. The goal is to not cut the blank too small but not leave more than can be removed cleanly in a single pass in the planer in the next step.
Use sample pieces to dial in the correct fence settings.
My example image shows the rough blank being the perfect size to minimize waste. In practice I normally make the rough blanks extra wide to make sure I get a full-sized hexagon. Better to have a little more waste rather than waste the entire blank.
Step 2b: Notes
- I mark my blanks with numbers on the end as shown in the images above so that in each step I an working on the identical face on each blank.
- If your blade isn't at 60 degrees exactly, that's okay so long as you keep you blanks oriented identically. i.e. when gluing up butcher block always have the '1' face pointing towards the same side. This works because the angles will be complementary.
- Lock the angle adjustment on the table saw blade as you don't want to change it until you're done with making all the hexagons.
Step 3: Plane Perfect
This step makes the hexagon heights all consistent. Send the blanks through the planer to clean faces 2 & 3.
Step 4: Adding borders to the hexagons
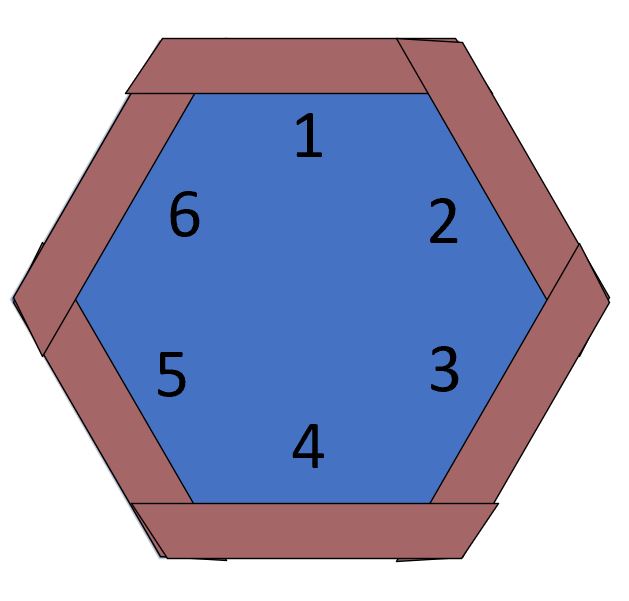
We've got perfect hexagons now but we have to mess them up in order to add a border. To provide a border around our hexagons we're going to add veneer to the outside faces. Then when we cut the column into shorter segments and line them up we'll have a nice hexagonal pattern with borders.
The process is to shave a little off the hexagon with the table saw to make room for the veneer, glue a strip on, then clean up using the table saw and planer. Then repeat.
Reset the table saw fence so that the blade trims a little bit off of one face of the hexagonal column. It doesn't matter how much you trim it just needs to be less than the thickness of one of the strips you cut in step 3. However much you trim off will be the thickness of the border.
Do not adjust the table saw fence again until you're done. Since my fence will slip if I put enough pressure against it, I plan to add additional clamping to keep it from slipping.
My image shows me starting with face 5 but really any face will work.
Step 4a: Trim off one face
My image shows me starting with face 5 but really any face will work.
Step 4b: Veneer
The previous step made the hexagon slightly shorter in one dimension. Now we add a strip of veneer to make the hexagon slightly taller in that same dimension.Step 4c: Cleanup veneered side
This step brings us back into a perfect hexagon shape again. We use the planer to bring the height of the hexagon back to the correct height. Using our initial face as an example we pass the column through the planer with face 2 down and face 5 up.We then need to clean up the veneer tabs sticking out to the sides. One of them we'll clean up using the planer. The other one we'll get when we trim the next face for veneering.
Step 4d: Rinse and Repeat
Rotate column and repeat steps 4a-4c until all sides are veneered.Step 5: Cutting slices
Now it is just a matter of cutting slices off the hexagonal column. I'm going to make a custom sled that cradles the hex column to reduce tear out.
Summary
So I've got plans for how to make my table top. I've worked through the design steps. What I don't have is the base that holds the table off the floor. I'd like to carry the hexagon theme into the base. Maybe I'll make the legs hexagonal...
The table needs storage. I haven't decided how much, or what form.
But at least I know how I'll make the top.
Subscribe to:
Posts (Atom)