Sunday, April 24, 2016

Civil War Campaign Desk Replica

The Desk


A friend of mine has been doing Civil War re-enactments for many years now. I'm guessing it must be close to twenty years since we did this project ten years ago. At the time he was a Sergeant and wanted to be able to have a field desk he could write reports at in camp. Since he knew I had a wood shop he asked me to help him build his desk.

So, this isn't really one of my woodworking projects, I provided advice and technical guidance but my friend - we'll call him Scott to preserve his anonymity - did most all the work.

I unfortunately don't have any pictures of it during construction.

I don't remember where Scott got the plans from. I do know he had to use pictures and some induction to get dimensions. If I remember correctly the short shelves in the middle are removable.


One place Scott didn't follow my recommendations was in the fame and panel construction of the door/front. I'd recommended a gap between the sides of the frame and the panel but he wanted the writing part of the desk to be perfectly flat. I warned him - quite strenuously I should add - that the panel would grow and shrink with the weather and humidity and would blow the frame apart.

I haven't seen the desk lately but last I knew the door was holding together fine. The back on the other hand had cracked. Scott, against my advice had glued the back in place rather than just nailing it.

I'm glad the door didn't explode; however, I am disappointed that my prediction didn't come true. It was summer when we built it, perhaps it was already at it's maximum size.

All in all, it came out looking very nice. The wood is Red Oak with a polyurethane finish. I'd didn't think Polyurethane was very authentic; however, he wanted maximum protection since it was going to be out in the weather.

He also build a folding stand to place it on.


Yup that's a lock in the top. He had to cut a shallow mortise for it in the door.

Since he built it out of Red Oak it is very solid. The only downside is that it is also very heavy. I think he may have added handles to the side after we took these pictures. Regardless I am pretty sure he just assigns a couple of his privates to carry it for him.

He decided to make dovetail joints on the box carcass so I 'had to' buy the Leigh Dovetail Jig. It worked out pretty good and the joints look really nice.

Even though Scott's project occupied every horizontal surface in my workshop for months it was a fun project to help out on

Thursday, April 21, 2016

Magazine Storage Box, Part 2 - Sides and Fronts

Templates

Before I dive into cutting the parts I need I start with using a set of templates.


I use the template in the middle both to trace out the sides and then as a template after rough cutting them. The two green templates I use for laying out the fronts. The one on the left is used as a window to see what the final piece will look like after being cut.

And yes, I know I wrote the wrong date on the template. Wood Magazine, October 2009, issue 193 is the correct date and issue.

Magazine Box Sides

I did a pretty good job - for me anyway - resawing the boards for the sides; but, even with that they still needed to be cleaned up after glue up. When I glued the two sides together I'd made an effort to make sure the flat sides were face down and even so after the glue dried I could put them through my planer to get the other side flat. After getting the opposite face flat I started alternating which face I sent through the planer to try and remove an even amount of material from both sides. Once the boards were just over the necessary 1/4" I sent them for a couple of passes through my drum sander.

I used the template of the side to trace out the shape of the sides on all my glued up side panels. I then replaced the 3/4" blade in my band saw with a 1/4" blade and cut them all to shape.


I next used double sided tape to hold the template to each box side and used my router table and a pattern following bit to clean up the rough cuts.

All that is really left for the sides is to finish sand them and cut a very shallow groove to hold the bottom.

Magazine Box Fronts

It is a little hard to tell in the photo below but the grain in the board isn't quite aligned with the sides. I used the template to select which grain I wanted and marked it on the board.


After marking one side of the front I used my band saw to cut to the line. I then used my jointer to make that one side flat and square. Then cut the front to width.


Most of the other fronts were much easier and I didn't need to go through extra effort of aligning the grain. I was able to straighten one side and then rip to width. The rest of cleaning up the fronts was the normal process of flattening one face on the jointer and then several passes through the planer to get them down to 1/2" thick.

While I was getting the fronts to the right thickness I jointed and planed the bottoms and backs at the same time. The boards I prepped for the backs and bottoms are a mix of quartersawn white oak and poplar. Basically what I had lying around the shop that was of an appropriate size.


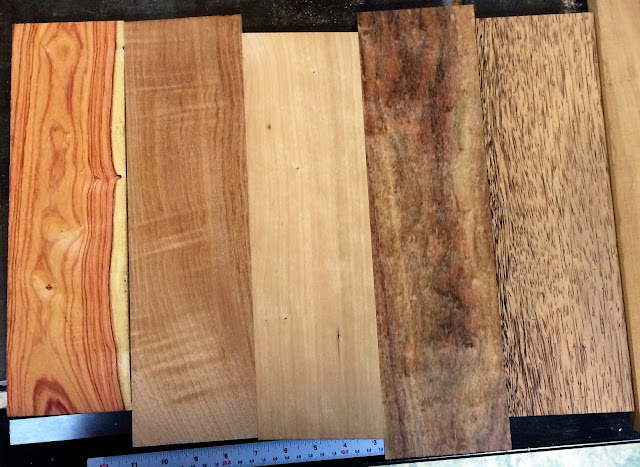
The fronts are a variety of woods. From left to right they are: Tulip, Spanish Cedar, Cherry, Chechen and Black Palm. The waves you see in the cedar is just a little curl or quilting. The cherry looks pretty bland in this picture but that's only because it is mixed in with some highly figured woods. It really will look quite beautiful once it has some finish on it.


This weekend I hope to get the fronts, backs and bottoms shaped and sanded and start gluing them together. Then a couple of coats of poly next week and I should be ready to start stuffing them with magazines.

[Edit 2016-04-24 I originally identified the first wood as Cocobolo rather than Tulip]

Wednesday, April 20, 2016

Magazine Storage Box, Part 1 - The beginning

Magazine File Storage Boxes

I've been getting and reading woodworking magazines for about fifteen years now. To be honest I read them for the first twelve or thirteen years and then I had a hiatus of a few years while I also wasn't doing a lot of woodworking. I periodically go through my already read magazines and index them. Basically any article or project that caught my eye gets put into a spreadsheet so that I can easily find it later.

After I index the articles I care about out of a magazine I put into into a Magazine File Storage box and put it into my library. Unfortunately I've built up quite a backlog of magazines I haven't indexed yet in addition to the ones I haven't read. About six years worth. Over the last couple of weeks I've gone through all the magazines I've read but not indexed and added them to my spreadsheet. I've got a couple of cardboard magazine storage boxes but I prefer the wooden ones I make from a plan I got a number of years ago.

Whenever I want to work on a project I'll make a photocopy and work from that to keep my magazines nice.  Since I'd made these magazine boxes I already had a photocopy and I knew I'd just seen them in my workshop. And thus began the search for the plans. 

The Search

First I scoured my workshop. They weren't there.

Then I checked to see if I'd brought them upstairs to read. Nope, not there either.

Maybe they were in the workshop, maybe if I did a more thorough search. Nope, certainly not there.

Maybe Google knows? I've found lots of things using Google but this time was a complete strike-out.

Well, they had to come out of one of my magazines. Maybe they were in my index. Nope, nothing in my index?

Well, I've only gotten half a dozen different magazines over the years so the plans had to come out of one of them. Maybe I could find them using on-line indexes? Wood Magazine? Horrible index and no dice. Popular Woodworking? Nope! ShopNotes Magazine? Nope! Woodsmith Magazine? Nope! Fine Woodworking Magazine? Nope! Woodworker's Journal? Nope!

Gah! I may also have uttered - or shouted - some profanity at this point.

Fortunately I had templates left from the first batch I'd made hanging on my wall. I remembered enough of how they were constructed, plus the ones I already had, plus the templates I should be able to replicate the plans. They really are pretty simple.

Looking at the templates I realized that whatever magazine they came out of provided full-sized templates for parts of the boxes. Hey, the only magazine I get that regularly provides full-sized templates is Wood Magazine! So back to the Wood Magazine on-line index. 

I found one magazine storage box plan but not the one I was looking for. If it weren't for the full-sized templates I would have thought I was crazy. I must admit I did entertain the thoughts that crazy was an option for awhile.

I usually prefer an elegant approach to problem solving; however, at some point brute force is the most elegant option available. I figured I'd just pull my magazine boxes with Wood Magazines and go through them looking for the plans. I pulled down two boxes and went through all of them and guess what? No plans!!!!

Gah! I may have doubled down on my soft utterances  of profanity.

My afternoon was slipping away. I'd planned on being at the lumber store hours ago and I still didn't have my plans. Then while I was preparing to just go ahead and go buy the lumber I wanted I saw another few boxes of magazines on my science fiction bookshelf. Hooray!

At last, at last! I found my magazine with the plans. It was in Wood Magazine, Issue 193, October 2009, the third from the end. Hooray!

I made a quick run to the lumber store to pick up some maple for the magazine box sides then cleaned up for dinner with friends.

Starting with the Sides

As I said earlier, these boxes are really pretty easy to make. There are two sides made out of maple that need to be a little smaller than 10"W x 13"L x 1/4"T. The tall front face is made from whatever nice looking wood you have lying around. The back and bottom can be made from whatever scrap you have lying around.

I started by cutting my maple boards into 13" lengths. I then straightened one side on my jointer then since my band saw's maximum height is 6" I ripped them down to 6" or slightly less.


I have had mixed results from resawing boards in the past but these went pretty well. I started by setting up the saw by mounting a 3/4 inch blade. I also added my resaw fence which is basically a tall point fence that allows me to change the angle of the board so that I can counter blade drift. 


The board sitting crosswise in the back is just there to hide the background clutter. This is what it looks like when resawing.


I spent a few hours resawing the boards. and ended up with a bunch of thinner boards.


Inevitably the boards warped as they were cut but not too badly. The next step was to pass them over the jointer to remove the blade marks and make the boards flat again, at least on one face. Once one face was flat I glued them up to make the blanks for the sides.


The picture on the right shows some of the cool things you get when you resaw a board. This is called bookmatching. After resawing the board you open it like a book and you get a mirrored grain pattern. I actually glued these two boards together on the other side so I could avoid the knot holes; however, this picture shows the bookmatching effect very well.

Current State

Since I didn't feel like using 40" clamps to glue two smallish boards together I had a fair bit of time while waiting for my glue to dry two sides at a time. I used this time to dig through my stack of off-cuts and other boards I'd bought special for this purpose and selected enough to make fronts, bottoms and backs for all the sides I was gluing together.


The next step is to shape the sides, cut the fronts, bottoms and backs to size, cut some dados and rabbets and then glue it all together. Simple, right?

Dresser, Part 6 - Catching up on progress

I may have been silent on my blog for the last two weeks but I have been making sawdust and progress on the dresser. There's a bit too much to catch up in one post so I'm going to break it up.

First, the dresser!

The dresser is in the finishing stage so it is a lot of putting a little bit of finishing and then waiting for it to dry. I finished putting polyurethane on the dresser carcass and moved it into my bedroom. It isn't quite ready for use yet but it is shoved off to the side with the drawer boxes in it for storage.


I reconfigured the finishing room for small parts and brought the drawer fronts and the door up from the workshop. My finishing area is basically an unused bedroom with a couple of tarps covering the floor from drips and spills. My finishing area is an old hollow core closet door on a couple of sawhorses except now that I have my saw ponies I replaced the plastic sawhorses which are going to my garage for other uses.

My finishing table was just large enough to get all the drawer fronts and the door onto but I also found out that I didn't have enough finishing pyramids. I thought it was just clamps I needed more of. Huh... But I stopped by Woodcraft and picked up another pack. I put a coat of Danish Oil on it all this last weekend and now I'm just letting it dry. They should be ready for polyurethane this coming weekend.


I haven't started building the top yet. I'll probably start that this weekend. It'll take me a couple of days to build the top so I should have the drawer fronts and door out of the finishing room in time to start putting finish on the top.

So, one more week for finishing the drawer fronts and door, two weeks for putting finish on the top and then the dresser will be done. After five years, three weeks doesn't seem so bad.

Monday, March 28, 2016

Drum Sander


Drum Sander

My local Woodcraft store had a sale on Jet power tools a month or so ago and I decided it was time to buy the drum sander I've been saving up for. I didn't have quite enough money in the piggy bank but it was close enough that it wasn't worth passing up the sale savings.

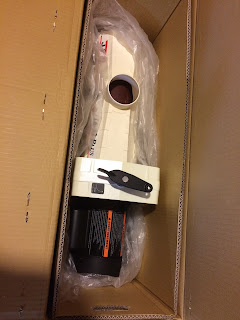
The tool comes in two boxes and each of them are pretty heavy. The guys at the store were nice enough to load them into my Forrester for me. When I got home I had my wife help me carry them downstairs. I could probably have managed on my own if I'd had to but why turn down help when it is handy.

Yesterday I decided to spend my shop time on putting it all together. I've been wanting to get it working since I brought it home but prioritized the dresser instead. I'd pulled the assembly instructions out as soon as I got it home but hadn't really read very much of them. Fortunately there wasn't really any prep necessary. It all went together pretty easily.

The instructions said to start with the legs so I started by unboxing the assembly stand pieces. Everything was very well packed. Each powder individual piece was wrapped in a separate heavy plastic bag to prevent scratches. Left to right, top to bottom the parts are: lower shelf, short rails, conveyor belt, legs and long rails.

The Assembly Stand parts
The first step was to assemble two legs to each short rail. Then attach the two leg assemblies together using the long rails.


The legs went together with carriage bolts and nuts, no washers. I considered adding washers but decided not to. If things ever loosen up these bolts are easy to access and I can just add washers and lock washers later. The next step was to flip the legs over and add the shelf.


Adding the shelf was a little more awkward since there wasn't anything to rest it on. I ended up sitting on the floor and using my knee to prop it up. After I got one carriage bolt in, the rest went together easy. Then I added the stem casters I'd purchased at Home Depot. They cost me $20 versus the $133 they would cost me on Amazon.


For the casters I dipped into my own hardware supply and added lock washers to make sure they didn't work loose. Next was flipping the stand upright and putting the motor on top.


You cannot see them in this picture but the motor has two pieces of plywood bolted to the bottom that keep it from bouncing around in the box. I'd definitely recommend keeping the motor box upright when moving it. I don't have a picture of it; however, with my wife's help we moved it to the top of the legs so that it sat crosswise from the pictures above. This allowed us to get to the hex bolts holding the plywood on.

After removing the plywood I spun it around so that it was on the stand properly and used the bolts that had held the plywood on to fasten the motor to the stand. I added washers and lock washers to these too.

The next step is to add the belt.


This went on pretty easy. Four bolts and it was on. The instructions mentioned that the belt had been over tensioned for shipping but didn't go into details on how to fix it. But never mind that! More steps to follow. I'd also purchased the accessory extension tables and it was time to put them on.


These came in a much smaller box and consisted of two U-shaped braces and two stamped steel tables. Shown above is unboxing the extension tables and attaching the U-braces. Next was adding the tables.


Hopefully you can see that there is a small gap between my level and the extension tables. The instructions say to level them so that they are just slightly below the height of the belt.


After leveling the extensions I set the tension on the belt, checked the sand paper and set the height gauge.


I couldn't find a good angle to get a picture of the height gauge. Its the shiny bit in the middle of the left picture. There's a tape measure on the front of the motor.

The first thing I thought when I saw the sand paper belt was, "What the heck! They wrapped it too loose?" Then I red the instructions on how to use the handy tool for manipulating the clamp that holds the ends of the sand paper to the drum.


Oh.

It is supposed to be that way.

The last step was to properly tension the belt and calibrate the height gauge. To adjust the belt the instructions said that the belt was too loose if hand pressure could make it slip. I loosened the belt and then tightened it in small increments until it stopped slipping. To set the height gauge I lowered the drum until it just touched the belt. Then I set the gauge to zero. Simple and done!

In Summary

I am super stoked. I work with a lot of thin material that can be quite challenging to flatten and smooth with a finishing planer. This tool should allow me to work with thin material that can - and has - exploded trying to run it through my planer. It will also allow me to work with figured woods that chip out in the planer.

I haven't done more than turn it on and haven't run any material through it yet but so far I'm really happy with the tool. The assembly instructions were clear. All the parts fit together without needing altering. The packaging was superb. They even wrapped a couple of wood blocks in plastic and wedged them under the drum for shipping. I wasn't surprised by the wood blocks but that they wrapped them in plastic! When I turned it on for a quick check everything ran smoothly and surprisingly quietly.

The kit came with additional bits that for other tools I would have had to purchase separately. It came with a height gauge measured in inches - and fractions - but they also included a metric replacement. They included one 80 grit belt on the drum and a few more replacement belts in a box. There's a special tool for helping fasten the sanding belt in the clamps. I was able to reach the clamp with a finger so I don't figure I'll ever use the tool but it was nice to have it included.

So far I am very happy with the purchase. If it works half as well as it went together it will be fine. If it works as well or better I'm going to be ecstatic!

Conflicts of Interest!

I do not have any. I do not have any financial ties to Jet, Woodcraft or any of the other companies I have mentioned in this post (other than I give them money and they give me stuff at fair market value). I purchased this tool out of my own pocket and did not receive any special discounts.

Sunday, March 27, 2016

Dresser, Part 5 - Polyurethane on the Carcass and What's Next

Putting Polyurethane on the Dresser

I took last weekend off from woodworking and mostly just putzed around the house. The Watco Danish Oil felt dry and smelled dry mid week but I waited until this last Thursday to start putting polyurethane on it. I got a second coat on it Friday and hoped to get two coats a day on it Saturday and Sunday. 

Unfortunately my Saturday morning coat wasn't dry Saturday evening so I only got one coat on it Saturday and today (Sunday) I didn't even try to get two coats. It's still pretty cool here and it's possible that I may not have thinned the polyurethane as much as I normally do. In any case it will take however long it takes.

Getting to the bottom and reaching the top is a little awkward. The top of the carcass will be covered by the dresser top - which is yet to be made - but I want to seal it with polyurethane anyway. The plan is to finish covering the sides then I'll tip it onto it's back and put a few coats of polyurethane on the top and bottom just to make sure everything is balanced.

I'd thought that maybe I'd build the top of the dresser this weekend but instead I let myself get distracted. I spent a few hours Saturday in the workshop getting the drawer fronts sanded so they are ready to come up to the finishing room. 

At this rate, I'll probably have the dresser carcass finished this week and be putting Danish Oil on the drawer fronts and door next weekend. If they take two weeks to get covered I effectively have three weeks before I need to build the dresser top. There's also a shelf I need to build for the large opening. I've been putting that off as well because I don't want to have it sitting around taking up space.

No pictures this week. It pretty much looks the same as in my last blog.

The Next Project

As the dresser is nearing completion I'm debating on what I want to do for my next project. I'm kind of hoping it doesn't take five years like the Dresser did. Of the things I am considering is:
  • Freedom 17 - A cedar strip canoe
  • Router Table - Norm Abram's New Yankee Workshop
  • Short Dresser - A shorter version of my dresser to replace the dresser my wife is using
  • Workshop projects
    • Remove some cabinets to gain floor space
    • Build walls and additional lumber storage
  • Gaming Console Console - A cabinet to hold my gaming consoles
  • Step Stool Chair - A chair that converts to a step stool

Freedom 17

The canoe has to be a summer project. I will not be able to get it out of the basement so it is going to have to be built in the garage.  I'd like to finish it in one summer because it will be much easier to store as a boat than as a half-finished boat.  This summer will probably not be ideal since I will probably be looking for a new job come fall. I'd rather not have the distraction of a boat.

Router Table

The router table is somewhat higher on the list. A number of years ago I needed a router table so I built one in an evening. It's basically a sheet of plywood with some braces underneath to keep it stiff. It sits on top of a pair of sawhorses. It's convenient in that I could take it apart and regain the space it is using but it tends to just stay set up all the time. I'd really like something more mobile and more convenient.

Short Dresser

My plan is to make an entire bedroom set. I mentioned making the bedframe that goes with my dresser and nightstand to my wife and she said she'd rather have a new dresser before the bed. I'm a little sick of working with quarter sawn white oak so that's likely to wait for a bit.

Workshop Projects

I've got a few kitchen cabinets in my workshop that were probably moved down there when the kitchen was remodeled in the mid 80's. I'm guessing that is that case because my house was built in the 70's which matches the dark walnut stained cabinets in my workshop and I've got crappy mid-80's style cabinets in my kitchen. I've got a corner of the workshop that is inaccessible and not well utilized. What I'm thinking is if I rip out the cabinets I'll gain floor space I can use to put tools.

Half of my workshop has walls framed with 2x4's 16" on center covered with T1-11 plywood. The other half has bare concrete block walls. I'm thinking of framing and paneling the other half, putting in some additional lumber storage and maybe a workbench.

These might get done over the summer but I don't know if I want to commit to them just yet. They're going to take a little bit of time. Also, I think I might rather have some of the other things on my list first.

Gaming Console Console

I've got multiple gaming consoles and currently they are sitting on the floor. I'd like to get them up off the ground and into a proper piece of furniture. I don't have any pre-made plans for what I want so I'm going to have to design something myself. Since this piece will be going into one of the nicer rooms in my house I want the piece to be attractive; however, I also don't want to put a lot of effort into it. My plans are going to have to balance utility, ease of construction and appearance.

Basically I'm not quite ready to start on this yet.

Step Stool Chair

I've been wanting to make one of these  step stool chairs for a few years now. They really appeal to my frugal nature and liking of things that multi-task. From my experience they make a relatively uncomfortable chair and a slightly inconvenient step stool. 

I've got a friend - let's call her Heidi to preserve her anonymity - who isn't what you would ever refer to as statuesque. Okay, she's short. She also has rather tall kitchen cabinets. This confluence is perfect. I want to make one of these chairs, Heidi could use a stool in her kitchen.

I think this is what I'm going to make next. The construction doesn't look that hard so it'll be a good summer project as yard work and other outdoor activities start to take precedence. I'll be able to putter away at it whenever I have time. 

I started the process Saturday afternoon by transferring the design plans to paper with a one inch grid. I started by trying to follow the plans weird skewed angle and decided it was too annoying. I restarted aligning the drawing with the grid. Since the drawing was scaled 1/4" to the 1" I was able to use a ruler to measure offsets and transfer them to my sketch. As the plans say, there are only a couple of important things to get right. The angle on the two pieces needs to be consistent - 70 degrees - and the height of the chair needs to be such that top of the seat back rests on the ground when folded into the step stool shape.


I'm happy with how it came out, but... I should have started closer to the left hand side of the paper. I don't have room to finish the other half the stool. It isn't a big deal. I can just tape another sheet of large graph paper to the right hand side and span two sheets or I can transfer what I have to a new sheet and move on. I just haven't done one or the other because I was working on the floor and my back started hurting. And it was time to go play some Mass Effect 3 anyway.

I plan to draw out the other pieces then cut them out of 1/4" hardboard. I'll use the hardboard to trace the final pieces and as a template to use my router table and a pattern bit to get the pieces exactly the same.

Wednesday, March 16, 2016

Dresser, Part 4 - Race to the finish

Monday evening after work and before cooking dinner I put the Dark Walnut Watco Danish Oil on the dresser case.


I worked my way around the case working in sections. It isn't terribly important with the Danish oil to keep a wet edge but by working methodically in a pattern I could make sure I got all the surfaces covered.

You can see that I didn't put the oil on the inside of the drawer cases.They are going to be hidden by the drawers so why waste the oil. Also, I am a bit low on the oil and I'd like to finish this project on the current can. It will give me a better odds of having a consistent finish.

I pretty much follow the instructions for applying the oil. I flood the surface with the oil using a shop towel. I try to keep it pretty neat but you can see the dark stains around the feet which is why I covered the saw horses with felt. If any spots look like they have absorbed all the oil I'll put a little more on.

After thirty minutes I put a second coat on following the same pattern.

After another fifteen minutes, it is time to wipe off any excess. I basically take a clean shop towel and wipe down the entire piece. I do this until the surface doesn't feel sticky any more.

At this point the instructions say you can use the item after 48 hours of put a top coat such as polyurethane on it after 72 hours. I'll be giving it at least twice that.

All oil based finishes - at least the ones I know of - need to cure which is distinctly different from drying. Finishes which cure are undergoing a chemical reaction which is typically a temperature sensitive exothermic - puts off heat - reaction. The warmer the environment the faster the finish cures. This is why you should never wad up wet oily rags and throw them in a trash can. The oil starts curing generating heat which trapped by the wadding and garbage can causes the reaction to accelerate which generates even more heat and so on until something reaches the temperature where it will spontaneously combust.

Anyway, I'm very careful to dispose of my rags carefully so  I don't burn down my house but almost as important I don't know how fast the oil on the case is going to cure. Since it is a bit chilly in upstate New York right now I'm going to wait to make sure the oil is cured. If the oil isn't cured when I try to put the polyurethane on I'll just end up with a muddy blurry mess.

There's one more issue. Oak has really large pores which absorb the oil. Over the first few days the oil in the pores will leak out. If I don't keep going back to the project and wiping it down a few times a day I'll get a blotch wherever the oil leaks. I wiped the case down twice again Monday night. I wiped it down twice on Tuesday, once in the morning and once in the evening. Wednesday I overslept so I didn't have time in the morning but I'll wipe it down before I head to bed tonight.

So I am going to wait at least 72 hours after the oil stops leaking out and I consistently get a clean rag when I wide the case down.