Templates
Before I dive into cutting the parts I need I start with using a set of templates.
I use the template in the middle both to trace out the sides and then as a template after rough cutting them. The two green templates I use for laying out the fronts. The one on the left is used as a window to see what the final piece will look like after being cut.
And yes, I know I wrote the wrong date on the template. Wood Magazine, October 2009, issue 193 is the correct date and issue.
And yes, I know I wrote the wrong date on the template. Wood Magazine, October 2009, issue 193 is the correct date and issue.
Magazine Box Sides
I did a pretty good job - for me anyway - resawing the boards for the sides; but, even with that they still needed to be cleaned up after glue up. When I glued the two sides together I'd made an effort to make sure the flat sides were face down and even so after the glue dried I could put them through my planer to get the other side flat. After getting the opposite face flat I started alternating which face I sent through the planer to try and remove an even amount of material from both sides. Once the boards were just over the necessary 1/4" I sent them for a couple of passes through my drum sander.
I used the template of the side to trace out the shape of the sides on all my glued up side panels. I then replaced the 3/4" blade in my band saw with a 1/4" blade and cut them all to shape.
I used the template of the side to trace out the shape of the sides on all my glued up side panels. I then replaced the 3/4" blade in my band saw with a 1/4" blade and cut them all to shape.
I next used double sided tape to hold the template to each box side and used my router table and a pattern following bit to clean up the rough cuts.
All that is really left for the sides is to finish sand them and cut a very shallow groove to hold the bottom.
Magazine Box Fronts
It is a little hard to tell in the photo below but the grain in the board isn't quite aligned with the sides. I used the template to select which grain I wanted and marked it on the board.
After marking one side of the front I used my band saw to cut to the line. I then used my jointer to make that one side flat and square. Then cut the front to width.
Most of the other fronts were much easier and I didn't need to go through extra effort of aligning the grain. I was able to straighten one side and then rip to width. The rest of cleaning up the fronts was the normal process of flattening one face on the jointer and then several passes through the planer to get them down to 1/2" thick.
While I was getting the fronts to the right thickness I jointed and planed the bottoms and backs at the same time. The boards I prepped for the backs and bottoms are a mix of quartersawn white oak and poplar. Basically what I had lying around the shop that was of an appropriate size.
This weekend I hope to get the fronts, backs and bottoms shaped and sanded and start gluing them together. Then a couple of coats of poly next week and I should be ready to start stuffing them with magazines.
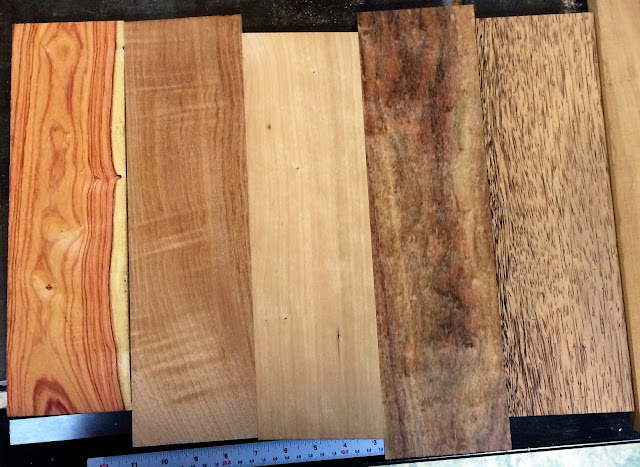
[Edit 2016-04-24 I originally identified the first wood as Cocobolo rather than Tulip]
While I was getting the fronts to the right thickness I jointed and planed the bottoms and backs at the same time. The boards I prepped for the backs and bottoms are a mix of quartersawn white oak and poplar. Basically what I had lying around the shop that was of an appropriate size.
The fronts are a variety of woods. From left to right they are: Tulip, Spanish Cedar, Cherry, Chechen and Black Palm. The waves you see in the cedar is just a little curl or quilting. The cherry looks pretty bland in this picture but that's only because it is mixed in with some highly figured woods. It really will look quite beautiful once it has some finish on it.
This weekend I hope to get the fronts, backs and bottoms shaped and sanded and start gluing them together. Then a couple of coats of poly next week and I should be ready to start stuffing them with magazines.
[Edit 2016-04-24 I originally identified the first wood as Cocobolo rather than Tulip]


